We recently ran an article describing scope zeroing basics. We discussed scopes, Minutes of Angle (MOA), milliradians (MRAD or Mils), and how to use shot groups. Given that article’s focus, we did not cover bore sighting. That was not an oversight, since bore sighting is its own deal and not strictly necessary. But bore sighting can be a useful tool and it can save you time and ammo. So, let’s briefly explore bore sighting, what it is, and how to do it. Like the scope zeroing article, this is a basic guide.
What is Bore Sighting?
Essentially, the term says it all. Bore sighting refers to aligning your rifle’s bore with your scope’s reticle before zeroing the optic at the range. You can do this several ways, which we will address. The benefit of bore sighting your rifle is that your bore and your reticle will be fairly close to one another in terms of the bullet’s impact point when you begin the zeroing process.
Being close means that you can get your shots “on paper” with fewer rounds, saving you time and money. Your point of aim/point of impact will also be closer together, meaning fewer adjustments to properly align them. Bore sighting is not perfect, nor does it replace zeroing your optic, but it helps. Let’s get on with the process.
Bore Sighting Options
In many ways, bore sighting is bore sighting. The only real difference is the tools you may or may not use and how to bore sight different rifle styles. Bore sighting requires access to the rifle’s bore (duh), either by looking directly through the barrel, using a laser, or by way of the muzzle. Some methods are easier than others, sometimes depending on the rifle. For instance, if I want to use the old Mark I Eyeball, I’m required to remove the rifle’s bolt. There’s just no other way to do it. Bolt-action rifles make this easy. Lever-action rifles, not so much.
It can be done but it’s a real pain. ARs are easy too. Just remove the bolt carrier group. AKs, on the other hand, are almost impossible because of the barrel’s relationship to the receiver. I say “almost” because some ingenious person out there may well have done it somehow. I am not that person. A semi-automatic hunting rifle would be so difficult as to be impossible.

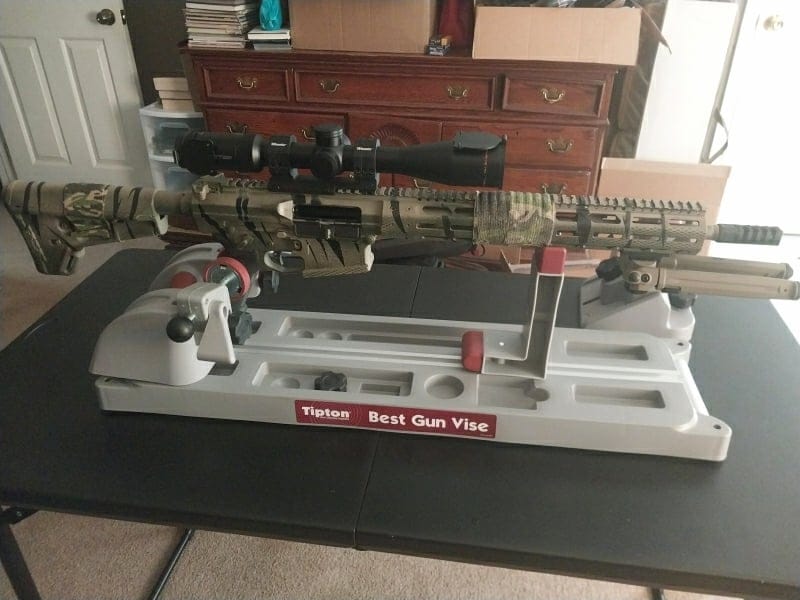
Bore sighting tools can ease the process, especially with the more challenging platforms. But you need to match the right tool to the right rifle. Collimator bore sight kits are great because they are compatible with most popular calibers and fairly simple to use. Laser bore sighters are precise and can be caliber-specific or one-size-fits-all. The main drawback to laser bore sighters, at least in 2023, is that batteries are wonky and don’t last very long. At least in my experience with several laser bore sighter brands. You will also need a solid, level base. I use a Tipton Universal Best Gun Vise.
Bore Sighting Methods
No matter which tool you choose, eyeball, collimator, or laser, the goal remains aligning your optic’s reticle and your rifle’s bore so the bullet hits where you want it to. It bears repeating that bore sighting is only meant to get you close. You will still need to zero your optic for precise accuracy.
Two of these methods require a certain amount of space between the rifle’s muzzle and the wall upon which you place your “target.” Many people recommend 25 yards. That’s fine if you have the space, but many of us don’t (except at the range, of course). I’ve found that a minimum of 30 feet gets my alignment “close enough.” Your “close enough” may be different than mine.
Finally, it’s a good idea to “center” your optic’s movement range before bore sighting. Start by turning your adjustment knob all the way to one direction or the other. Then slowly move it all the way in the other direction, counting your revolutions. Finally, go back to halfway. This puts your optic near its center, allowing maximum movement in each direction. Do this for both elevation and windage.
The Eyeball Method
This requires you to look directly through your rifle’s barrel. If you can’t do that, skip ahead. I can technically see through my AK’s barrel, but it’s at an angle. That’s useless. I could also use this method by removing the bolt from my lever guns, but that’s more trouble than I want. But a bolt-action rifle or an AR work very well here. The procedure is simple:
Step 1: Place your rifle on a stable surface, preferably in a vice to prevent shifting. Make sure it’s level.
Step 2: Measure the distance from the center of your bore to the floor. On the wall opposite your rifle, place a visible dot at the same height as your rifle’s bore. This can be a bullseye target, or a dot drawn on a paper plate. Up to you.
Step 3: Looking through the barrel, align your rifle so that the dot is centered in the bore.
Step 4: Without shifting the rifle, look through your optic. Adjust your windage and elevation until the reticle aligns with the dot on the far wall.
Step 5: Confirm that your bore is still properly aligned, then confirm the reticle. Congratulations. You are now bore sighted and ready to zero your optic. Keep in mind that this is the least precise method discussed here.

Collimator Bore Sight Kit
A collimator bore sight kit does not require bolt removal. Nor does it require extra space.
Step 1: Place your rifle on a stable surface, preferably in a vice to prevent shifting. Make sure it’s level.
Step 2: Attach the proper arbor to the optic grid and carefully insert it into your rifle’s muzzle until it’s snug. Do it slowly so you don’t damage the barrel’s crown or rifling.
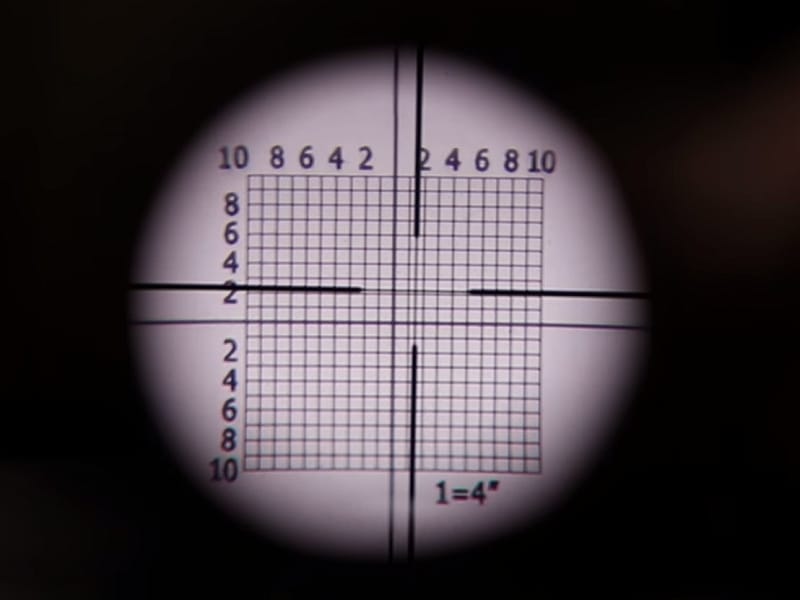
Step 3: Look through your optic and adjust until the bore sight’s grid is clear. Make certain the grid is level with your reticle’s crosshairs or hold lines. If you just have a red dot, use a level.
Step 4: Adjust your optic’s elevation and windage until your reticle aligns with the grid’s bullseye. If you have to go more than 6 or 8 “inches” worth of adjustment, you should check your scope’s mounting.
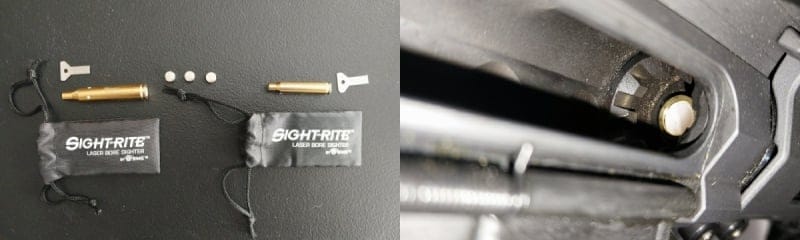
Laser Bore Sighters
There are two kinds of laser bore sighters. One fits in your rifle’s muzzle, much like the collimator bore sight. This kind is useful because it’s compatible with most calibers. The other is shaped like a cartridge case and is caliber-specific. I’ve used both and either one is fine, though I’ve found the cartridge-shaped lasers are a bit more accurate since they insert directly into the rifle’s chamber. This is especially true of muzzle brake-equipped rifles. The following steps work with both types.
As noted earlier, my experience with laser bore sighters has taught me not to trust the battery life. I’ve gotten as much as 45 minutes or as little as 5 minutes from brand-new batteries. I recommend keeping an ample supply on hand. Luckily, they are inexpensive.
Step 1: Place your rifle on a stable surface, preferably in a vice to prevent shifting. Make sure it’s level.
Step 2: You can either place a target on the far wall, as with the Eyeball method, or you can just bounce the laser off the wall. A target is useful if it has grid squares, and some laser kits come with reflective targets, making outdoor use viable. I’ve done it both ways.

Step 3: Insert your laser into the muzzle or the chamber until it is snug. This is important to make certain the laser hits in line with your rifle’s bore. Because of the uncertain battery life, I recommend not activating the laser until you’re ready to go.
Step 4: Adjust your elevation and windage controls until the reticle aligns with the laser dot. If I have an illuminated reticle, I use the highest brightness setting so the laser doesn’t wash it out. Sometimes it still does, though. But if you only see one bright dot, you should be golden, assuming your batteries haven’t quit. That does happen. You can mitigate this problem by aligning the laser on a target’s bullseye beforehand. That way, if the batteries go belly up, you can still adjust to the target’s bullseye.

Zero Your Optic
I’ve said it before. I’ll say it again. Bore sighting is no substitute for zeroing your optic. Bore sighting gets you close. “On paper,” if you will. It saves time and ammo. You are responsible for shooting accurately, no matter what your rifle’s role. Bore sighting can be a step in that process. But it’s not the final step.
Consider incorporating bore sighting in your system. Ammo prices aren’t going anywhere unless they go up. Not anytime soon, anyhow. You can get a bore sighter for about the price of a box of ammo, depending on your caliber. But it will quickly pay for itself. I bought my first bore sighter in 2021, and I now bore sight all my optic-equipped rifles. Do your research and get what you think works best for you. You’ll probably be glad you did.