If you want a light and laser combo, the CMR-301 Crimson Trace Rail Master Pro is an awesome choice. I don’t use lasers on all my weapons, but they have their place in the tactical and self-defense world. Mounting both is not an option on every gun. Limited rail space, weight, and other attachments can create obstacles for many people, depending on their rifle setup. The Crimson Trace combo provides both options in one small package.

Red dots have come a long way over the years, but there are still some benefits to using a laser. Especially at close distances, a laser can be quite handy. To use a red dot, the firearm needs to be at eye level with your dominant eye focusing on the dot. A laser sight removes that need at close distances by allowing you to focus on a moving target instead of looking through your optic. You can see where your laser is compared to your target and adjust quickly.
CMR-301 Crimson Trace Rail Master Pro Laser/Light Combo
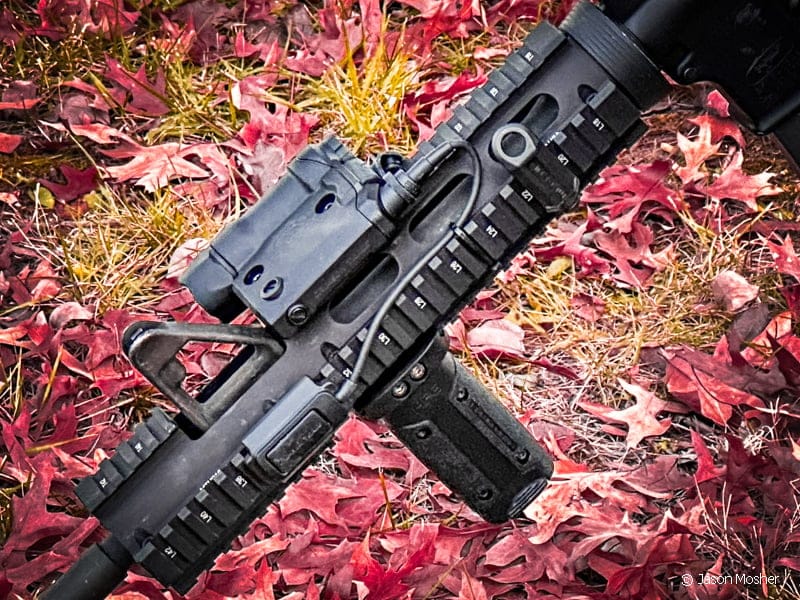
If you still want the option of a laser without taking up a ton of room, this laser/light combo is worth checking out. Designed to use minimal space, this side-by-side style unit has a laser on the left and light on the right. The Rail Master comes with two different types of mounting brackets. One is an M1913 Picatinny rail mount, and the other is an M-LOK attachment. First, attach one of the two brackets to your rifle and then mount the Rail Master Pro to the bracket.
I zeroed the 5-mw green laser at 25 yards to use it for close quarters. For anything further, I move to my iron sights or whatever optic I have mounted. While I didn’t drop my rifle on concrete, I did drop it multiple times at the range. I wanted to see how well the laser would keep its zero. I placed it on my old Bushmaster so I wouldn’t have to worry about scratching my gun. Afte a few drops and 300 rounds, the laser was still zeroed in.
Operating the 301 CT Rail Master Pro
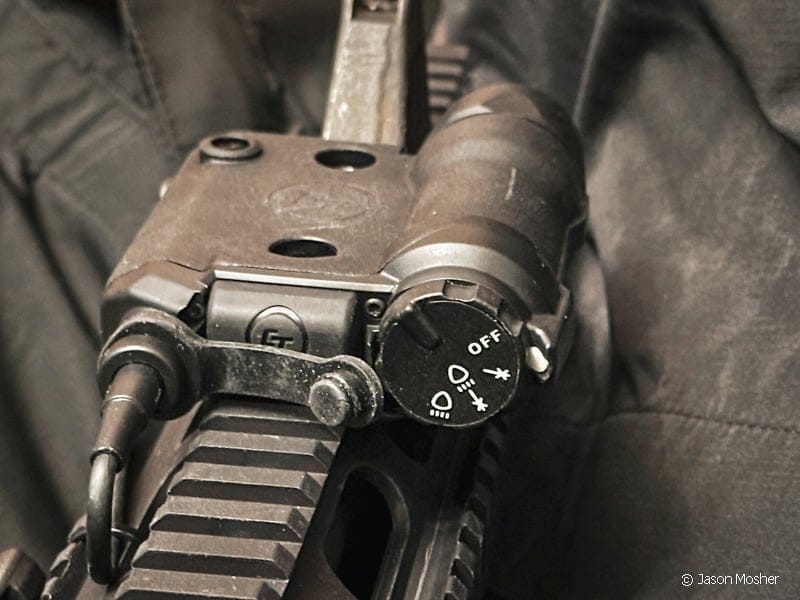
The 301 Rail Master has a dial on the back with several options. A small button on the back activates whatever setting you have it on. A dial on the back right-hand side allows you to select the mode you want the Rail Master to operate. When the dial is turned all the way to the right, the unit is in “off” mode. This means the activation button won’t work either. I like this setting for storage because you know it won’t get turned on by accident.
A Picatinny mount for the pressure pad is included in the box. When the remote switch is plugged in, the power button on the back of the unit is deactivated. Pushing the pressure switch one time quickly will turn the unit on until pushed again. If you press and hold for a few seconds, the unit turns back off when you let go. I like this feature, as momentary light is preferred in some situations. I keep the mode dial on light/laser for home defense, but I also like that you can set it to laser only.
The light and 3 Programable settings
Crimson Trace placed a bright 1,000-lumen light in the Rail Master, which is nice for such a small light. It runs on one rechargeable 1100 mAH battery, which does give me some concern with run time. Most of my weapon-mounted lights use two CR123 batteries or a rechargeable battery equivalent to two CR123s. I couldn’t find a run time listed for the 301 Rail Master, so I found out the old-fashioned way. I turned it on and left it.
It ran for a little over an hour before dying, which isn’t bad, but not the best either. The CR123 is a 3V battery, and the CT rechargeable battery is a 3.7V. So, it’s a little bigger than a CR123 but not the equivalent of the two. With one hour of constant run time, this light would last a while when using it momentarily. You need to take it out and charge it after each use. You do get a charging cable with the battery in the box.

Summary
Overall, the 301 Rail Master appears to be a well-made laser/light. It’s not heavy, but it doesn’t have that cheap feel to it either. Compared to buying a separate light and laser, it’s an affordable option for the quality. I use larger weapon-mounted lights on some of my rifles because I want a dedicated light that lasts a long time. But having a small combo package is just handy in some cases. I took mine out to the range, and the bright green laser is easy to see even in the daylight.
The 301 Rail Master has an IPX7 waterproof rating, which adds to its durability. I haven’t owned it for long, but I like what I see. Having three adjustable brightness settings is a nice feature, and again, the green dot is plenty bright. If you want an easy way to add both a light and laser to your weapon, I recommend giving the CMR-301 Rail Master Pro a try. Crimson Trace has a good reputation and stands behind their product. They offer a limited lifetime warranty, which includes free product replacement or repair. Electronic components have a three-year warranty.