In recent years, body armor has become more widely available to the average consumer. It’s no longer reserved for law enforcement and military personnel. While there’s always the possibility of unsavory characters acquiring body armor, this equipment is invaluable in the hands of the good guys. As such, plate carriers and hard armor have exploded on the market, with a variety of companies offering options at different price points. However, how does someone go about selecting and setting up a plate carrier?
A plate carrier does far more than just carry body armor. Medical kits, lights, radio communications, and spare ammunition are just a few of the many options you can include on a plate carrier setup. These overwhelming options are largely up to the user’s personal needs. A homeowner looking to defend their home won’t need a setup like a member of a law enforcement tactical team or special forces operator. However, there are some recommendations that I believe are universal to plate carriers and worth keeping in mind when selecting and setting one up. For part 1 of this series, let’s discuss the bare basics of selecting, setting up, and fitting a plate carrier.
Plate Carrier Selection
There’s a huge selection of plate carriers available on the market. From inexpensive options like Condor to top-tier brands like First Spear, there’s a price range for everyone. Most quality plate carriers range from a few hundred dollars, with some approaching or exceeding $700. The primary point of concern is durability, comfort, and longevity.
If you’re running and gunning every day, higher-quality gear is worth looking into. However, I offer a word of caution—expensive isn’t always durable. Recently, I had an expensive plate carrier from a reputable manufacturer fail and begin tearing at the seams. Unfortunately, this manufacturer didn’t honor its warranty. While I won’t name them, this is a big reason why I’m working on purchasing another plate carrier. The original carrier was lightweight but wasn’t durable enough for regular use.
Steel plates will be rougher on your carrier. I own a set collectively weighing in excess of 20 pounds. This additional weight isn’t gentle on fabric and needs to be accounted for when selecting your carrier. In addition, some manufacturers offer additional padding, cummerbunds, and highly customizable adjustments to fit their equipment to your body. There’s much to be said about wearing a properly fitted plate carrier. Unfortunately, you won’t get this with cheaper ones. However, if the goal is only to have the carrier for intermittent use for home defense, active shooter response, or otherwise brief defensive purposes, then a more cost-effective option may be worth pursuing.
Selecting Gear
Choosing the gear to attach to your plate carrier is nearly as important as the carrier and armor itself. Once upon a time, my vest carrier was set up with everything but the kitchen sink. Dump pouch, medical kit, six magazines, etc. After some brief training with it, I began shedding weight. It’s nice to have everything you can think of on a plate carrier. However, reality has a harsh way of hammering us on the constraints of weight, bulk, and gear positioning. I’ll delve further into this topic in part 2 of this series, where I discuss working with the plate carrier and gear placement considerations.
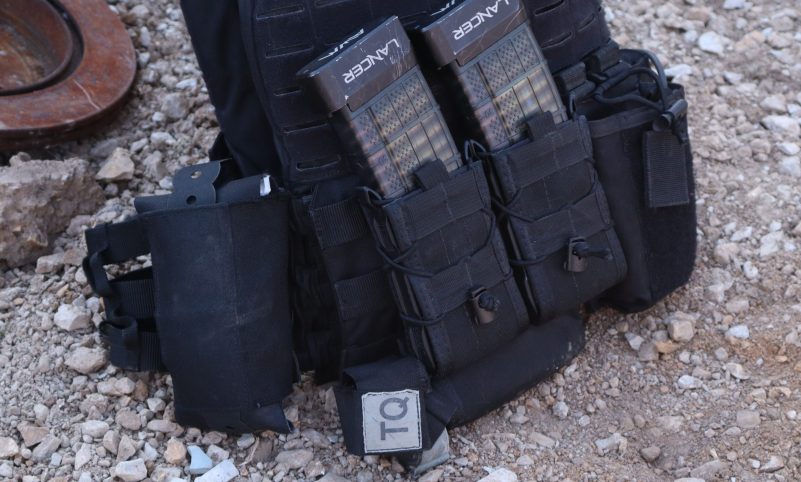
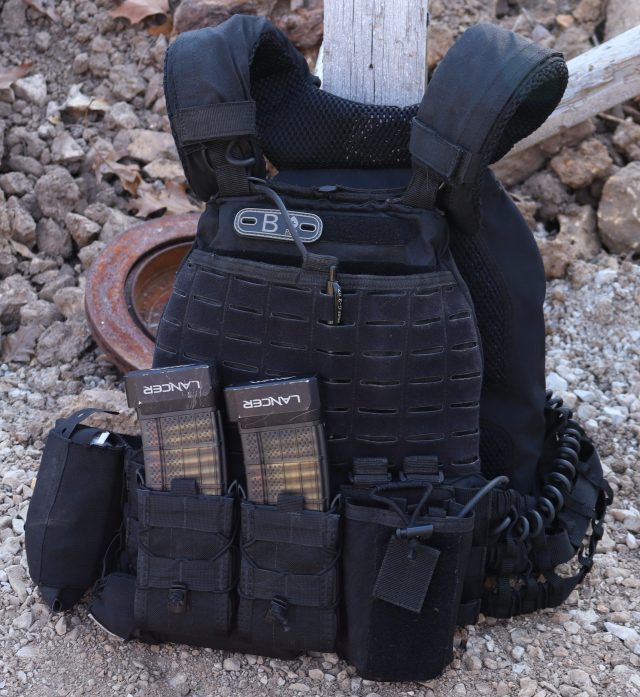
If your carrier is set up for an active shooter, a couple of magazines, a flashlight, and a robust medical kit go a long way. The same goes for home defense. Personally, I use my plate carrier for plain clothes work and tactical operations. My carrier is equipped with two spare magazines, a radio pouch, and a medical kit. My setup is oriented so all of the equipment is accessible with either arm. Blue Force Gear, HSGI, First Spear, and many others offer some great options for MOLLE and PALS attachments. The main focus is determining what you need to carry and ensuring it’s positioned for easy access.
My medical kit sits on the right side of the carrier but is still accessible with both hands. The medical kit contains several rolls of combat gauze, chest seals, QuikClot, and elastic banding. While tourniquet loadout is a whole other topic worth diving into, you can never have enough. I keep additional tourniquets accessible on my tactical belt and normally carry at least three. The admin pouch on the top of my vest also stores several additional chest seals along with pens and a notepad.
Sizing and Wearing the Plate Carrier
Wearing any kind of body armor is more involved than slapping it onto your body. Unless properly fitted, body armor is useless. The plate carrier should ride high on your shoulders and back. Plate carriers equipped with cummerbunds are less prone to this issue. Unfortunately, many folks wearing soft and hard armor allow their vests and plates to drift downward on the front of their body. While less common with soft armor, hard armor in a plate carrier tends to have this issue more often because of the weight imbalance from gear on the carrier’s front.
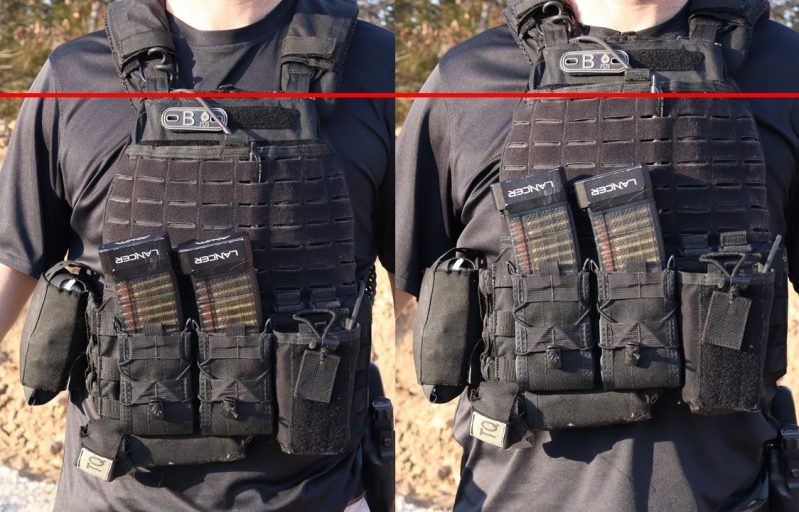
The first step in properly fitting your carrier is to adjust the shoulder straps. If the straps are too long, the carrier will ride too low. The top of the plate should sit approximately even or just above your collarbone. A low-hanging carrier exposes the upper chest, lungs, and neck. This is what many refer to as a “negative” consequence. Ideally, the plate carrier should sit higher and cover the front and back of the upper torso evenly. Yes, it’s not protecting your abdomen like you may want, but a shot to the lower abdomen isn’t going to take someone out of the fight (or permanently end it) like a shot to the chest will.
Once you’ve properly positioned the shoulder straps, adjust the carrier’s waist for your torso. It shouldn’t be loose but don’t tighten it so much you’re gasping for air. Developing a feel for a proper fit around the waist takes some practice and trial and error. Frankly, if you’ve never ran with a plate carrier on or conducted training with one, do so now. More on that in part two, though…
Start Somewhere
We all have a starting point. While we can learn from others’ experiences and mistakes, sometimes we make our own. I have a nice collection of gear I no longer use sitting in a box in my office. Early on, while making my way on my own, I learned that the right gear for the right application was important. My gear today isn’t always the most expensive. However, its durability and functionality have proven worthy of my needs.
By no means is this article an exhaustive conversation on plate carriers and available options. Rather, I want those entering the market to know what they should focus on and spend their hard-earned funds on. While an admin pouch is helpful for storing my gear for law enforcement purposes, it may be more suitable for a compass, flashlight, or other items for the average individual. For others, it may serve no purpose to their knowledge — yet. If you have the funds to expend, go with the top end. However, adding more stuff to a plate carrier doesn’t make it more functional. In fact, it may actually hinder your performance, as we’ll discuss in the next part of this series. Until then, think hard about your equipment and train even harder.
