Want to build your own Glock pistol? For people who like to build guns, AR-15 rifles are by far the easiest to customize. The AR-15 is a long-established platform and continues to be the standard for modern rifles, with a lot of parts and options available for a build.
In the handgun world, Glock has become the customizable equivalent to the AR-15. Before Glock, 1911s were at the top of this list. But now Glocks are even challenging Browning’s legendary 1911 for those who want to build their own handgun.
There are a ton of options from a wide variety of companies to choose from when building a Glock. Be warned, though, that building a gun is addicting, and you will more than likely want to build more.
Starting Out: The Lower Assembly
Just like with the AR-15 rifle, the process of building the gun is divided into two main sections: the lower frame and upper slide assembly. The lower, or frame, is the part considered the “gun” and everything else is simply parts of the gun. The lower frame and slide are what give the gun the look you want, and the parts installed change the quality and customized look it will have.
A Glock can be built with OEM (Original Equipment Manufacturer) parts or high-end after-market parts. We will go through each step of assembling the lower parts on the frame before moving to the slide assembly.
Parts Needed
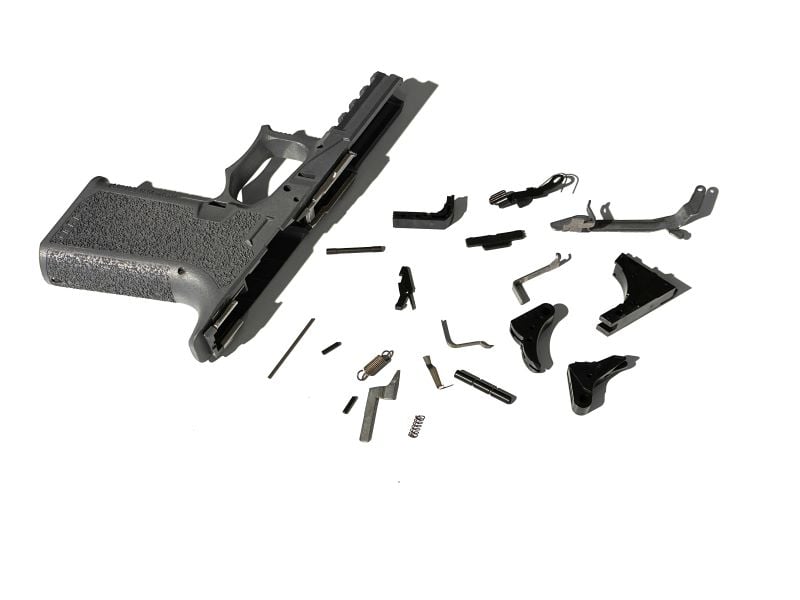
Because frames and parts are easier to get for Gen 3 Glocks, I am building mine based on the Gen 3 design. When selecting your frame, make sure it is compatible with Glock Gen 3 parts. If you want to build a different generation of Glock, there are some options, just not as many. I chose a Polymer 80 frame in grey. It has a black slide with serrations that show the barrel through the slide. I’m building a Glock 19 Gen 3. Once you have a slide and frame selected, you will need a lower parts kit, an upper parts kit, and a barrel. If your slide parts kit does not include sights, you will need a set of those too.
Some basic tools will be needed, too. This includes a set of punches, needle nose plyers, an armorer’s block, an armorer’s hammer, and a sight pusher to install the sights. We will go over the tools needed as we install each section of the build. It’s important to have the right tools when building a gun, but a Glock build does not require nearly as many custom tools as an AR-15. A basic punch and hammer set from Real Avid or Wheeler are almost everything needed. An armorer’s bench block is helpful but a piece of 2×4 with some holes drilled in it can work too.
Installing the Magazine Release
Parts Needed: Magazine catch spring, mag release, and frame.

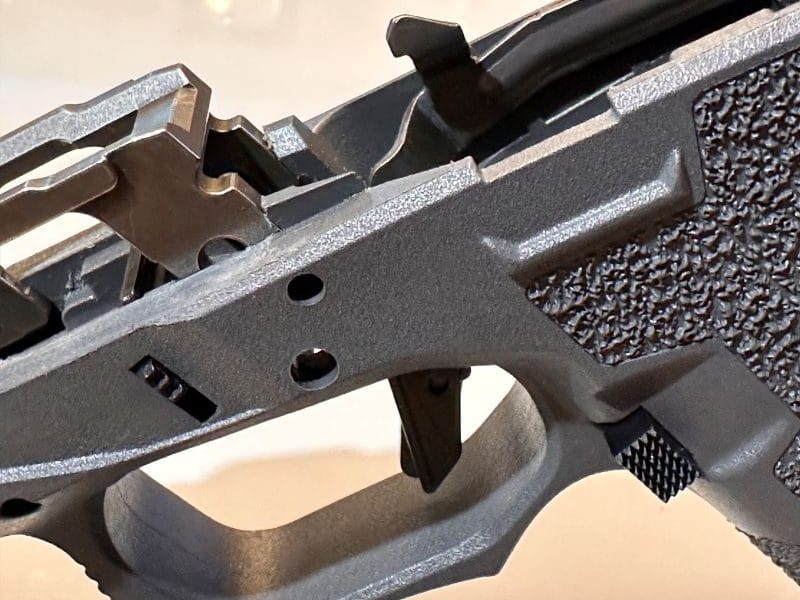
The first part we will install on the Glock 19 frame is the magazine catch spring. Don’t be fooled by the name and look for a spring. Instead, the mag catch spring (see photo above) is a small metal pin that pushes on the magazine release because of the pressure that is placed on it after installation. Using needle nose plyers, push the spring into the hole in the middle of the mag well from the top. Push on the spring to make sure it is seated all the way. Next, insert the mag release from the right side of the gun.

The mag release must go behind the spring so you may have to use a pick or flathead screwdriver to pull it back so the mag release can slide in behind it. Now push the spring to the right side of the gun and into the groove (see photo above). I used a small flathead screwdriver to push the spring over. This will put pressure on the mag release.
Putting Together the Trigger Assembly
Parts Needed: Trigger housing, connecter, trigger spring, and trigger bar assembly.
The first thing we will install is the connector to the trigger housing. There is a longer piece that sticks out from the connector you push into a slot on the trigger housing (see photo A below). Next, the trigger spring will connect to the back of the housing. There is a hole for the spring to attach to (photo B below). Attach the other end of the spring to the trigger bar as shown in photo C and the trigger assembly will be ready to install in the frame. Install the trigger as well if the trigger bar does not already have the trigger attached. The kit I ordered included a trigger, but it was not installed on the trigger bar.

To attach the trigger, use the small pin and insert the trigger bar into the slot on the top of the trigger. A small armorer’s hammer works best for tapping in the pin. The photo above shows the trigger bar attached to the trigger. After installing the trigger assembly, we will move on to the slide stop, locking block, and slide catch/release. This will be in Part 2 and then we will move on to the (upper) slide parts kit. The slide assembly is easier than the lower parts kit, at least for me, and goes a little faster.


Installing the Lower Assembly
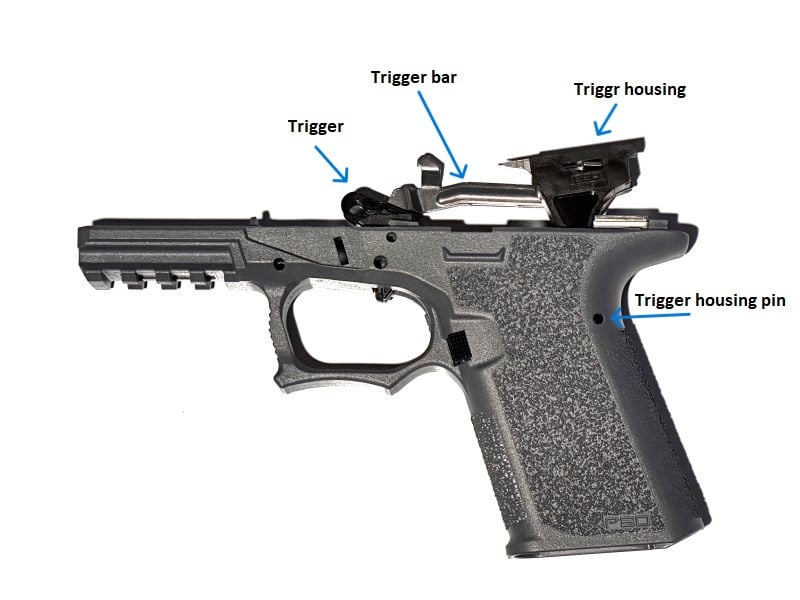
Now that the lower assembly is ready to install, we will be placing it into the Glock frame. But first, we need to make sure the trigger assembly is in the right order. The spring should be attached to the trigger housing, but we need to set the trigger bar in the housing. To do this, rotate the trigger bar over the top of the trigger housing until the cross shape of the trigger bar is on top of the housing. You will have to rotate the bar a little to get the edge of the bar to go into the groove of the housing.

Now we can set the trigger housing into the gun frame. The trigger housing will go towards the rear of the gun and the trigger end will go down through the opening for the trigger (see photo below). As the trigger goes through the trigger slot of the frame, the trigger housing will push down into the opening just behind the mag well. The trigger bar will sit up against the inside of the frame. Once it is seated all the way, install the pin in the upper back portion of the handle. Use a punch if needed for this step. In many cases, the pin may push in without any tools.
Installing the Slide Stop
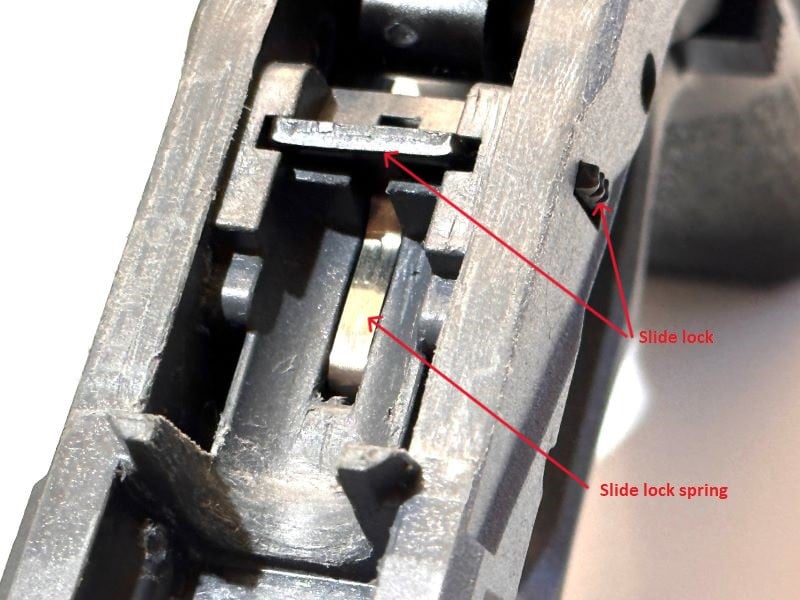
For this part, you will need the slide lock spring, slide lock, and frame. The slide lock spring on a Gen 3 Glock looks more like a thin metal bar that is bent. The end of the slide lock spring looks like it was bent. This bent piece will go down into the groove of the frame in front of the opening for the trigger. The other end of the bar will stick up and put pressure on the slide lock, which we install next. When the slide lock is in the upward position, the slide cannot come off the gun.
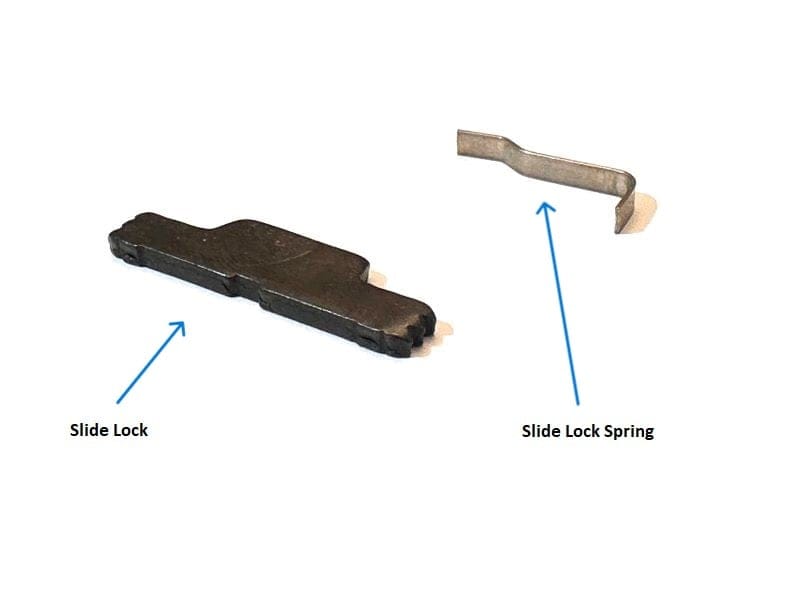
Once the slide lock spring is in, we can insert the slide lock into the gun from either side. The rigid side of the slide lock will need to face the rear of the frame. There is a small notch at the bottom of the slide lock. This will face down and go over the slide lock spring. Use a small punch to push down on the slide lock spring as you slide the lock over the spring. If the slide lock is installed correctly, the spring should be pushing the slide lock up. When the gun is assembled, you will pull down on both sides of the slide lock to release the slide and remove it from the frame.
Installing the Locking Block
The locking block is very easy to install and is one of the larger pieces in the lower parts kit. To install the locking block, place it in the frame with the notch facing toward the rear of the gun. It will push down into the frame until the holes line up for the pin to go through. The locking block pin is the smaller of the two pins. It may have grooves cut in it, but others will be smooth. Insert the pin to hold the locking block in place.
The trigger pin is the larger of the two pins and may also have grooves cut in it. Start the trigger pin in the hole from the right side of the gun, but do not go all the way in. If there are grooves, insert the pin until it reaches the second groove. The slide release lever will need to be installed before the pin is pushed the rest of the way in.
Installing the Slide Stop/Release Lever
The last thing to install on the frame is the slide stop/release lever. This part has a small spring attached to it and the end with the spring is the part that goes into the frame. The wire “hook” shaped spring will go in with the hook facing upwards. Push the slide release under the locking block pin and to the far left side of the gun frame. The hook part of the spring will push against the locking block pin. The slide release lever will hang over the gun frame so that the lever can be pushed with a thumb once the gun is finished.

With the slide release lever in place, the trigger pin can be pushed in the rest of the way. Sometimes, it will go in without any issues, and other times, it wants to catch on the trigger or slide release lever. Don’t force it, but wiggle it around until you get the parts to line up, and the pin will push through. The trigger pin should be flush on both sides, and the locking block pin should be just below the surface of the gun.
Wrapping Up with the Lower Frame
The lower frame is now complete and ready for the slide. The fun thing about learning to build your own Glock-compatible lower is the ability to customize the gun to your own liking. You can change out parts for a different look or function anytime you want. Some people like to build their gun from a stripped frame (like we did here), and others like to buy a Glock and slowly make upgrades.
For now, I have placed the slide from my Bull Armory Gen 3 to see how the lower functions. I like the looks of it enough that I may just leave the slide on this frame and place the slide we are about to build on the frame of the Bull Armory. Again, that’s the fun part of building guns that are universal. You can switch them around and make the gun you want.
Shop This Article


Installing the Slide and Slide Parts
The slide can change the whole look of the gun. There are color options to choose from and a wide variety of serrations and cutouts. Once you have chosen your slide, you will need a slide kit, barrel, and a set of sights. When the slide has cutouts, the finish of the barrel and color will also change the look of the gun. If you plan to use a compensator or silencer on the gun, a threaded barrel is a must. Don’t forget to select a slide with an RMR cutout if you plan to use an optic.
Firing Pin Safety
Locate the firing pin safety and firing pin safety spring. The spring is small and will fit in the end of the firing pin safety. There is a groove on the inside of the firing pin safety that will hold the spring in. Make sure the spring is pushed in far enough to catch the groove. If you hold the firing pin safety upside down and the spring falls out, it is not put in correctly. Place the firing pin safety pin in the large hole on the bottom of the slide. The spring should go in first. Push on the safety pin to make sure it moves freely.

The firing pin safety blocks the firing pin from striking the bullet. As the trigger is pulled, the trigger bar pushes up on the firing pin safety. This allows the firing pin to travel down the groove and strike the cartridge. Many people think the small lever on the trigger, called the trigger safety, is the only safety on a Glock pistol, but blocking the firing pin safety mechanically blocks the firing pin from contacting the cartridge.
Installing the Extractor
The extractor is next up. On one side of the extractor is a part that is rounded like a pin. This part should be towards the rear of the gun (see photo below). The extractor will go in on the right side of the slide just behind the ejection port. Once it is in, push down on the firing safety and it will go in the rest of the way. The extractor is what grabs the bullet and pulls it out of the chamber when the slide is moving backward.
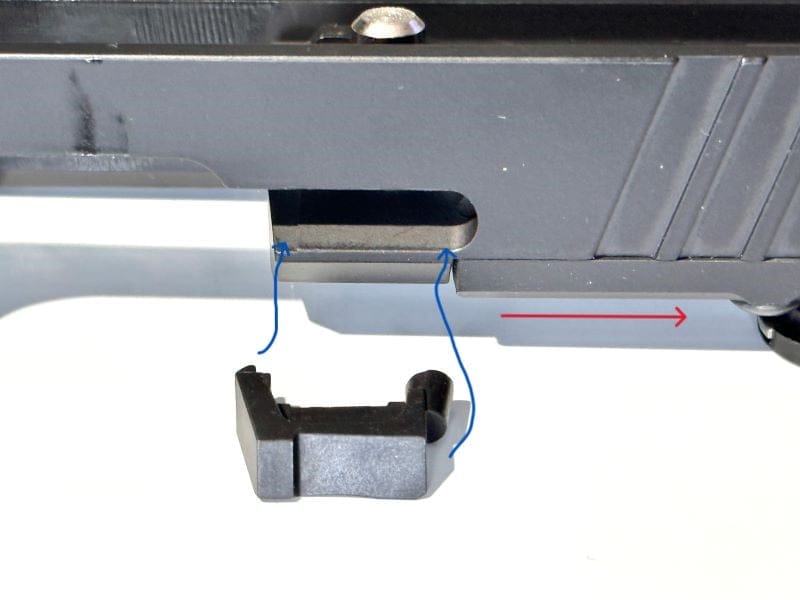
It is important to understand the difference between a failure to extract and a failure to eject when you work on your own firearms. As you can see from this process, changing out an extractor is very simple. But if you do not realize an issue is being caused by the extractor, you could end up taking off the wrong part. Extractors can get dirt in them, wear down or even break. If the cartridge is not being pulled out of the chamber, it is more than likely an extractor problem.
Extractor Depressor Assembly
For this part, you will need the spring-loaded bearing, extractor plunger spring, and extractor plunger. To assemble the extractor depressor assembly, place the spring over the end of the extractor plunger. There is a small, pointed side that the spring will snap onto. Then place the spring-loaded bearing onto the other end of the spring. The assembly will go into the small hole on the back of the slide. The metal end should go first. Make sure the assembly moves freely inside the channel or the extractor will not work properly.
In one case, I had an extractor plunger that was just a little too big. The pointed end that the spring pushes over was spreading the spring out just enough that it would not move freely inside the channel. I didn’t realize it would cause an issue until I fired the gun and found it would not eject any shells. To resolve this, I took the extractor plunger back out and carefully sanded down the end until the spring would push over it without a lot of force. The ejector plunger then moved freely in the channel, and I have never had another issue with it.
Firing Pin Assembly
The firing pin assembly has a total of four parts. These are the hardest parts to assemble from the slide parts kit. But don’t worry, it’s not that bad.
To start off, place the firing pin sleeve over the firing pin. The firing pin will slide into the groove of the sleeve so that the part sticking up goes into the groove. Next, we need to install the spring and secure it with the cups. This is the part some people find tricky. To hold the firing pin up while putting on the spring, I used a 5/32 punch and an armorer’s block. If you do not have an armorer’s block, you can make one with a piece of 2×4 wood. Cut the 2×4 about 6 inches long and drill a few holes through it. Make the holes large enough for the back side of a punch to fit in the hole.

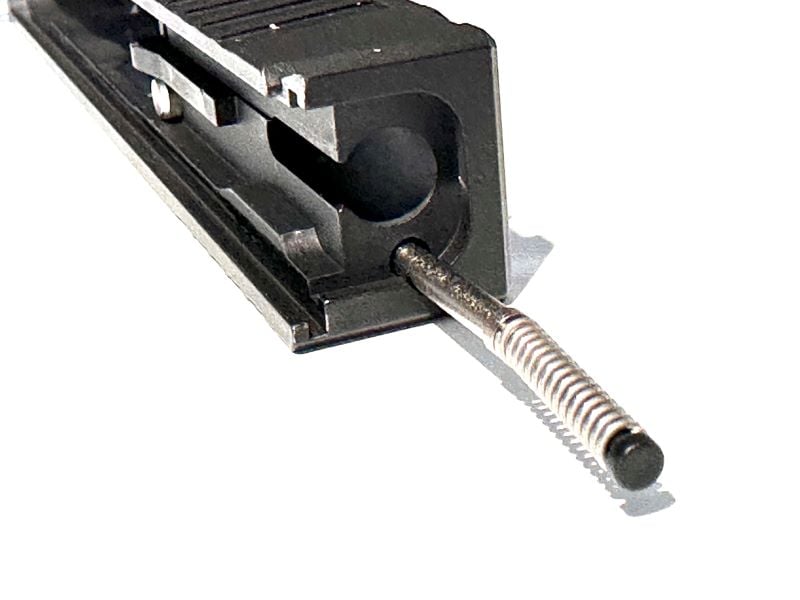
I placed the punch in the armorer’s block and placed the firing pin and sleeve over the punch. This helped me hold it up while installing the spring cups. The spring will need to be pushed down until a cup can fit over the small rounded portion of the firing pin. I find it easier to do one cup at a time. Once the first cup is on, push the spring down again far enough to place the second cup beside it. When both cups are on the firing pin, they will hold the firing pin in place (see photo below).

Installing firing pin and plate cover
The slide cover will go on next. Use a small punch to push down on the firing pin so that it goes under the slide cover. Push the slide cover up just far enough to hold the firing pin down and then use the punch to push in on the ejector plunger. Once it is pushed in, the slide cover should push up the rest of the way. If installed correctly, the cover will go all the way to the top of the slide and you will hear a “click” as it falls in place.

To remove the slide cover, turn the slide over so you can see the bottom of the slide. You will see the firing pin and spring through the open track. Use the punch to pull back on the firing pin (this takes pressure off the slide cover) and push the slide cover just enough to dislodge it. Once it has come loose, you can push it the rest of the way off. Be sure to keep your thumb over the back of the slide as you push it off so the firing pin and extractor plunger do not come out.
Installing Sights and Barrel
The last things to install on our slide are the front and back sights. The backsight is the hardest if you do not have a sight pusher tool. If you plan to replace or install sights on Glock pistols, I would recommend buying a sight pusher. I use the Real Avid Sight Pusher, and it works great.
For this process, insert the slide into the sight tool and use the bottom handle to lock it in place. Then, slowly turn the larger handle on the side of the tool so it can push the sight out of the slide. When installing a new sight, simply push the sight in the groove as far as you can by hand and then use the sight pusher to push it back into the center of the slide.
The front sight also takes a small wrench, which comes with the Real Avid Sight Tool. They can also be purchased separately for just a few dollars. The screw for the front sight can be found on the bottom of the slide, near the front. If you are replacing it, just unscrew it and take the old one off. The new sight will sit in the hole from the top of the slide and the screw will secure it from underneath. The screw needs to be snug, but don’t over-tighten it.
Finishing Up
With the slide complete, we have now assembled a full Glock 19 pistol. When I started this project, I intended to build the lower and upper as a set. After finishing them, I decided I like the lower with the Bull Armory slide better than I do the slide that I built. This is one of the nice things about guns that are interchangeable. You can mix and match to your own liking.
I took both of these guns (one with the new frame and one with the new slide) to the range for a test. It’s always fun to shoot a gun for the first time if you built it yourself. Both of these guns fired without any issues just like you would expect from a Glock.

The grey frame I selected goes nicely with the silver slide of my Bull Armory G19 and the Black slide with a golden barrel looks just as good with the Bull Armory frame. If you do have issues on the range, be patient and identify the problem. Take the gun apart and look for the part that’s causing the problem and correct it. The process is fun, even when you have to work out a few bugs. But when you’re done, you have a gun that you built and it looks exactly how you want.
Shop This Article
-
TacFire Gen 3 Glock 19 / 23 Slide Completion Parts Kit w/ Stainless Steel Guide Rod
 $44.99$32.99Save $12.00