Did you know your AR-15 will keep shooting even if parts start to break inside? The AR-15 rifle is a very durable weapon. It may not have earned the nickname “mud gun” like the AK-47, but it can still hold its own. So much in fact that it will keep firing even when parts start to wear out or break.
Firing a rifle with broken parts inside can be dangerous and damage the rifle even more. During my first armorers course, I discovered the bolt on my Colt AR-15 had a crack in it. There is no telling how long it had been there, but I’m glad I found it before the bolt broke into pieces.

Even with the best parts money can buy, a gun can break because parts will wear down as they are used. Regular maintenance and inspection are needed to keep the weapon running and in tip-top shape. I have seen ARs that are still running perfectly after thousands of rounds.
There is a lot of debate about how often an AR needs to be cleaned or even lubricated. Inspecting a rifle, however, is not the same as spending hours scrubbing every part with a toothbrush. It also doesn’t mean you will ever find anything wrong with it. I know a guy who passed the 50,000-round count on his rifle and it’s still running great. But other rifles have had parts fail with far less use.
Basic parts of the AR-15 Rifle
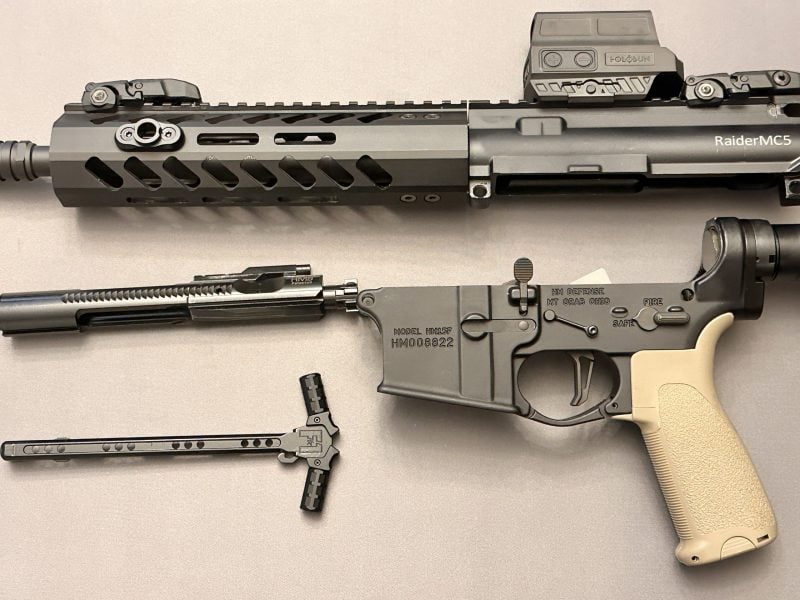
The AR-15 has a lot of parts in it; these consist of an upper receiver and lower receiver as the two main groups. Each one of those has sub-units that consist of multiple parts. You don’t have to take every little spring and pin out of an AR to inspect it, but it is still good to understand what parts are in the gun. Here is a breakdown of the main components of the upper and lower receivers:
Upper Receiver
- Barrel Assembly: This includes the barrel, barrel nut, gas block and tube, hand guard, and muzzle break.
- BCG (Bolt Carrier Group): The bolt carrier group consists of the carrier, bolt, firing pin, gas key, cam pin, and firing pin retaining pin.
- Charging Handle
- Forward Assist
- Ejection Port Cover
Lower Receiver
- Fire Control Group (Trigger Assembly): Includes the hammer, trigger, disconnect, springs, and safety/selector.
- Buffer and Tube
- Stock
- Pistol Grip
- Magazine
When inspecting the AR, you of course want to start with making it safe. Remove the mag, check the chamber, check the chamber again, and then keep the barrel pointed in a safe direction. I like to use some type of cleaning mat to lay my parts on as I disassemble the AR. A small flashlight comes in handy to help look over each part as it is being inspected.
Inspecting the Upper Components
Most of the AR-15 can be inspected by simply field stripping it and looking over the main pieces. Breaking some components down further is a good idea from time to time as well. There is no order the rifle must be inspected in. You can start with the outside and work towards the inside or the other way around.
I like to break mine down and start with inspecting the bolt, firing pin, and the rest of the BCG first. I then inspect the chamber, gas port, gas tube, barrel, and then the handguard and muzzle break. After checking the charging handle and handguard I move on to the attachments. This includes the sights, optic, and any other attachments I may have like the weapon light, QD mount (quick detach mount for slings), etc.

When inspecting the bolt, the areas on each side of the cam are the most prone to crack or break. Look for any hairline fractures or cracks. The rest of the bolt carrier can be inspected including the gas rings and firing pin before re-assembling the BCG.
In a later article, I will get more into the complete disassembly of the BCG and how to inspect the extractor, ejector, O-ring, and springs associated with the BCG. During the inspection, loose parts, as well as chipped, cracked, or weak springs are some of the most important things to look for. Springs wear out over time and are extremely easy and cheap to replace.
Inspecting the Lower Components
The lower receiver has more pins and springs than the upper. I like to start with the buffer tube and spring to make sure there are no obvious issues and that the castle nut is secure. I then move on to the trigger group and look for any signs of weak springs or worn edges to the disconnect or hammer. Worn areas on these components are critical as they can cause accidental discharges if they become to worn out.
A visual inspection of the area around the selector is sufficient to make sure nothing has fallen into the lower receiver or come loose. There should be a distinct “click” when you rotate the safety/selector. If you do not hear one, it may be wise to inspect the selector detent and spring (access these under the pistol grip).

Next, check the dust cover, mag release, and bolt catch on the upper. Again, look for worn-out springs or anything that doesn’t feel right when each one is manipulated. Insert an empty mag into the receiver and remove it several times to ensure the magazine is “clicking” into place and releases easily when the mag release button is pressed. Check the takedown pins to ensure the springs are good in each one and then check the pistol grip. Make sure it is not loose and there are no cracks appearing anywhere.
After this, the upper and lower can be reassembled. Once reassembled, perform a functions check on the trigger and safety to make sure everything is working properly. I also like to add a little synthetic oil to it as I reassemble each area.
Summary
I don’t keep exact counts on how many rounds I run through each one of my rifles, but with my best-estimated guess, I like to inspect my rifles every 3,000 rounds. Others wait much longer, and some do it more often. With an armorer background, I enjoy this process, so it does not feel like a chore to me. The point is to make sure there is some type of plan in place to inspect a rifle periodically throughout the life of the firearm. For those who are not comfortable doing this, find a gunsmith or armorer who can tackle the job.
A rifle is a machine. There are metal parts rubbing on metal parts creating friction, and causing heat and carbon buildup. I like to think of my rifle as a car. It needs some regular maintenance to keep it running in good health. It needs some small parts replaced from time to time, it needs an oil change, and it needs an inspection.