If you’re at the point in your firearm journey where you’re attending or considering attending gun school, you might be wondering what to expect. After all, there are numerous range rules and drills to consider. And while some rules vary by range, certain practices are universal. Ready positions are one of the things that remain the same wherever you are. Now, some ranges might use different positions for different things, but if you know what the various positions are in advance, it’s a huge help.
Check out our list of the ready positions you’re most likely to use at gun school.

Low Ready
The low-ready position might be the one you’ll run into the most in classes (depending on where you go). Basically, low ready involves aiming the gun down at the ground, off-target, with your arms extended but relaxed. Your arms should not be bent, and the gun is not held into the body. It’s being aimed at an angle toward the ground. Take care not to aim the gun at your feet. The gun should be aiming at the empty space ahead of you, not so stiffly down it’s near your toes.
What’s the low ready position good for?
It has quite a few applications. It’s a good position to use while standing on a firing line waiting for the command to begin a string of fire. With everyone’s guns at low ready they can all be seen and they’re all aimed in a safe direction. Also, they can be brought on target quickly. This keeps the muzzle of the gun off target, meaning you’re adhering to one of the rules of gun safety—don’t aim the gun at anything you’re not willing to destroy. Low ready is also commonly used as a resting position during live fire practice.
From a tactical perspective, there are also benefits to low ready. For example, if you’re clearing houses or some other spaces, keeping the gun at low ready stops the gun from being stuck out in front of you, which can lead to it being taken away or otherwise deemed useless. It also gives you decent reaction time while allowing you to see what’s going on in front of you, such as a potential attacker’s hands. And, if an attacker was to come at you and prevent your raising the gun, you can still fire the gun at their feet and legs if need be. That’s a huge plus over having the gun raised and pinned to where the only target is the ceiling.
High Compressed Ready

This is one you’re less likely to see in your average class. High compressed ready involves keeping a full firing grip on your handgun with your finger indexed along the slide. The gun is held tightly to your chest, muzzle aimed at the target/potential target. Your elbows will be sharply bent but also held snugly to your upper body. The gun itself will be held at the correct height and angle for it to be speedily punched out to a firing position.
What is the high compressed ready used for?
Some shooters use it as a scanning position, meaning the gun is immediately ready for action as they scan the area to assess threats. This use makes it less likely you’d ever use it in daily life, but not impossible. A more relaxed compressed ready is also sometimes used which allows the arms to relax slightly and the muzzle of the gun to be slightly aimed downward, although still significantly higher than the standard low ready.
Keep in mind that while you’re on the range, using the compressed ready is aimed at nothing but air and targets. However, once you go out into the real world, a gun held at high compressed ready is going to be aiming at things that can be destroyed. This isn’t a ready position that should be used as a go-to, like low ready, but instead requires a specific understanding of when it’s reasonable to use. It does have tactical applications, but it takes a little more training to approach correctly.
Sul
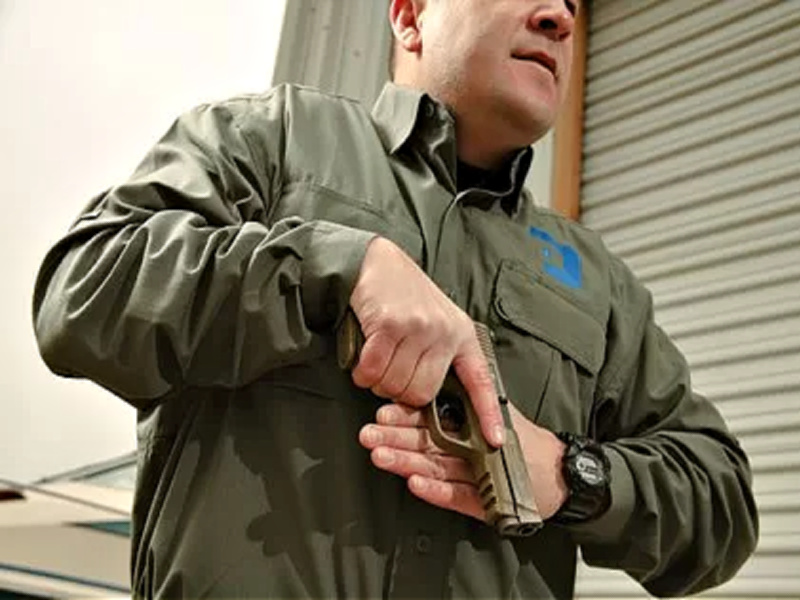
The Sul position is one that’s been a bit used and abused in the tacticool community. Sul was never really meant to be a ready position per se, but more a safety method. It has its uses, but also its downsides. As with many things in the gun world, there are those who love Sul, and those who hate it. Both sides have strong arguments.
Sul involves placing your support hand flat against your body, palm side in. The strong hand retains a firing grip with the trigger finger indexed along the slide. The gun’s muzzle should be aimed downward, or “south” (which is the definition of the word Sul), and the off side of the pistol will be against the back of the support side hand. The strong side hand gripping the gun will be at a higher level than the support hand, which has the off-side of the slide resting against its back.
To do this properly, elbows should not be stuck out like chicken wings but held against the body as closely as possible without becoming awkward. Some people put their support hand palm side in against their chests. Others choose to place that hand against their abdomen. There are pros and cons to each. This is a position far better illustrated by images and doing than through the written word.
When using Sul, take care not to aim the gun so aggressively downward that it aims at your own feet. Also, be aware of the risk of sweeping a fellow shooter when working as part of a team. Keep in mind you aren’t going to get on target as quickly using Sul as you can with a low ready or compressed ready. If you’re participating in a class where the instructor preaches Sul as the end-all, be-all ready position, it’s a good idea to reassess whether that’s somewhere you should be training. While Sul has its uses, they’re quite specific.
A word on why SUL exists:
Trainers Max Joseph and Alan Brosnan were in Brazil teaching foreign law enforcement, who did not have holsters. A safe, holster-free position was devised and used as a means by which to hold the handgun in relative safety without sweeping the others. It wasn’t meant as an active ready position, but more an administrative one. Of course, it didn’t take long for its use to be altered once it appeared here in the States.
What position should you use?
Knowing what position to use when you’re on your own is a matter of training and experience. Generally speaking, low ready is the go-to. Also, there are more ready positions than the three mentioned here. These are simply the most commonly used and seen.
What ready position is your favorite? Tell us in the comments section.
