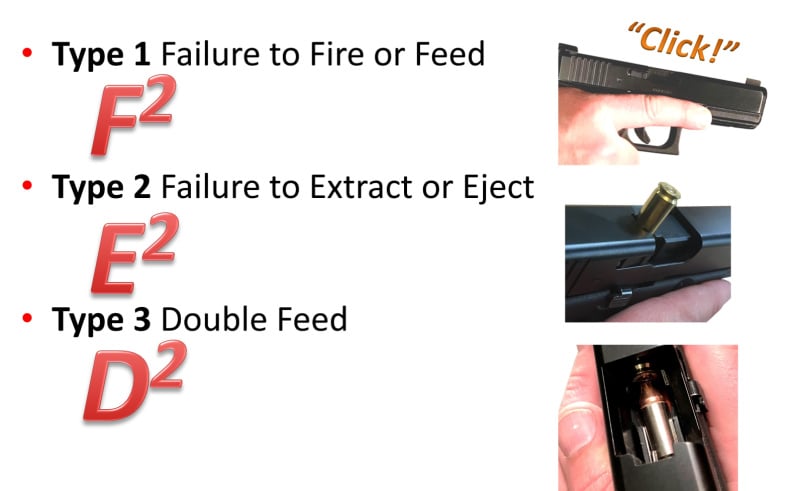
Malfunctions in semi-automatic handguns can be classified into five categories or events. We train these as F2 (Type 1: failure to feed or fire), E2 (Type 2: failure to eject or extract), and D2 (Type 3: double feed). Though there are five major causes of a malfunction, there are only two techniques for clearing these malfunctions. I have been to multiple training courses that teach a split-second diagnostic phase when your firearm fails to fire to determine which malfunction has occurred and then decide which technique to employ. Although this split-second diagnostic and choice between two options feels tactical, I would argue it is likely to fail in a high-stress situation.
Instead, I would suggest a much simpler approach to utilizing the technique that works in most situations first, and only using the second technique when the first does not work. Let’s begin by discussing the five malfunctions and the two techniques to clear a malfunction.
Malfunctions
Malfunctions come in five varieties but can be broken into two broad groups based on the technique to clear them. The first two are generally characterized by a trigger going ‘click’ when you expect a ‘bang’.
The first is the failure to feed, meaning that a round was not chambered, and the trigger released the striker or hammer on an empty chamber. The solution in this case is to chamber another round. The second is the failure to fire, meaning that there was an ammunition issue or a mechanical issue, resulting in a light primer strike and a failure to ignite the powder. In either case, the best strategy is to remove the unfired round and replace it with a new one. If the problem was a light primer strike, this is a mechanical issue that may require further maintenance than a field malfunction clearance can address.
Both the failure to feed and failure to fire are addressed by running the action to clear the current round (if chambered) and load a new round in the chamber. This is achieved with the “Tap, Rack, and Ready” technique discussed below.
The next two are the failure to extract or eject. The failure to extract is when a round has fired, but the empty shell casing failed to extract from the chamber, resulting in a new round being unable to properly load into the chamber after firing. The failure to eject, often referred to as a stove pipe, is when a spent round is pulled from the chamber but fails to fully eject from the ejection port, again blocking a new round from being chambered. In both cases, the solution is to run the action again to eject or extract the round on a second try.
The final malfunction is the double-feed, but I would also include any malfunction that the Tap, Rack, and Ready technique did not resolve into this category. A double-feed occurs when two rounds are trying to be chambered at the same time. Much like a failure to eject, the slide will not be fully locked forward, and the trigger will be dead. Also, like the stove pipe or failure to eject, this condition is visibly identifiable as the slide will be held in the open position by the two rounds trying to occupy the same space.
In this case, the Tap, Rack, and Ready drill will not likely clear the malfunction. The technique needed here is the more complex type three malfunction clearance technique.
Type 1 and 2 Malfunction Clearance Technique
Failures to feed, fire (type 1 malfunctions), extract, or eject (type 2 malfunctions) are all addressed with the same technique. To clear any of these Type 1 and 2 malfunctions, you will utilize the “Tap, Rack, and Ready” technique. This technique will clear most of the possible malfunctions, and make it less likely that you’ll end up with a Type 3 malfunction, which requires a different technique.
Tap: While keeping the firearm pointed in a safe direction (for tactical purposes, still aimed at potential threats), remove your support hand from the gun and quickly give a decisive tap or hit to the bottom of the magazine. This step is often skipped, but it serves two important purposes.
First, if the problem is that the magazine is not fully seated (failure to feed), it will solve this issue, barring mechanical failure of the magazine. Second, if the problem is that the slide has just not fully locked into position the firm tap is likely to result in the slide locking forward. If either of these issues is the problem, skipping the tap may fail to fix the malfunction or could cause a greater issue.
Rack (or Roll and Rack): After tapping the bottom of the magazine, move your support hand into a strong overhand grip on the back of the slide. For right-handed shooters, this will also have a secondary effect of rolling the ejection port (the Roll) towards the ground and using gravity to help clear the chamber and port. Once the grip has been obtained, pull the slide fully to the rear and release it quickly.
Ready: As the slide locks forward, return your support hand to your two-handed grip, and you should be ready to re-engage any remaining threats. Throughout this process, the goal is to keep the gun pointed in a safe direction and, ideally, at potential threats in a tactical situation. If you find you need to bring the gun closer into your chest to manipulate the slide, remember to move your body, not the gun, to make sure your muzzle is not flagging anyone who is not a threat and stays pointed in a safe direction.

Type 3 Malfunction Clearance Technique
Type 3 clearance is more complicated than Type 1 and 2 techniques. The Type 3 clearance shares the concerns previously mentioned with the Tap, Rack, and Ready technique but with more steps. Even with practice, this technique can take a few seconds. That may seem like a short amount of time, but in a self-defense encounter, seconds can seem like hours. For this reason, I would suggest practicing this technique while under cover.
Step 1: While keeping the muzzle pointed in a safe direction or towards potential threats, use your support hand to remove the magazine from the gun. This may require applying some force to the magazine, and in the case of some guns, notably 1911s, may require that you pull back and lock the slide to the rear.
Step 2: Once the magazine is removed, transfer it to your dominant hand that is still maintaining a firing grip on the handgun and retain the magazine using your dominant hand’s pinkie finger.
Step 3: While holding onto the firearm and magazine with your dominant hand, use your support hand to obtain an overhand grip (the same technique for racking in the previous technique) and then rapidly and fully rack the slide three times with the ejection port turned slightly to the right allowing gravity to assist in removing any obstructions.
Step 4: Regain control of the magazine with your support hand and firmly return it to the magazine well.
Step 5: Rack the slide a final time (releasing the slide after pulling back to chamber a new round into the gun.
Step 6: Return your support hand to its position in your two-handed grip.

Diagnosis vs. Simple Action
Many training programs suggest shooters quickly examine the slide to determine if they can identify a stove pipe (failure to eject) or double feed when the trigger is either dead or a trigger press results in a ‘click.’ The other malfunctions are less likely to be easily identified.
I prefer playing the odds while keeping it simple. If the gun does not function, this always indicates the need to complete a Tap, Rack, and Ready drill. As this will clear the majority of malfunctions and, with practice, can be completed very quickly, I would argue this should be the automatic reaction to a malfunction. If the technique results in the gun still not working, it is time to start moving toward cover while performing the Type 3 malfunction clearance technique.

Malfunction Clearances in Long Guns
These thoughts also apply to most long guns, including most semi-automatic magazine-fed rifles and shotguns. In some cases, the sizes of the parts being manipulated, the strength of the springs involved, and the size of the rounds may all result in these techniques requiring more force and practice. The only real change is including a tug to the tap on the exposed magazine to ensure it is firmly seated. Additional techniques may be required to clear alternate malfunctions, such as a stuck bolt on a semi-automatic rifle. The solution to a malfunction with a tube-fed pump-action shotgun is to simply run the action in hopes of clearing malfunctions and chambering a fresh round. On second thought, maybe I should devote a future article to malfunctions in long guns.
