Have you ever wondered how hard it is to build your own AR-15 rifle? It may not be as hard as you think. With the right tools and some help knowing what to buy, you could be on your way to building your first AR-15 rifle. Buying a rifle that is ready to go is exciting, and customizing one is even more exciting. If you have ever upgraded the pistol grip, charging handle, handguard, muzzle flash, etc., it makes the gun mean something more to you. It has your own touch, and the possibilities of colors, finishes, and accessories are almost endless. But there is something different about building your own AR-15. The first time I built one, I felt a sense of pride.
Starting with a stripped upper and lower receiver, you can install every screw, spring, pin, and every other part on the gun. Building your own rifle allows you to pick out each part to make it exactly what you want. I didn’t want to worry about scratching my rifle the first time I built one so I used the cheapest parts I could find.
I was pleased to see how easy it went together and my first trip to the range with it was a blast. It fired flawlessly and is still functioning great today. I have built lots of ARs since that first one, but it never gets old. AR-15s are like Legos for adults. Each one is different and fun to put together. Over a series of five upcoming articles, I will be building my own AR-15 and covering each step as I go.
Choosing the Type of AR to Build
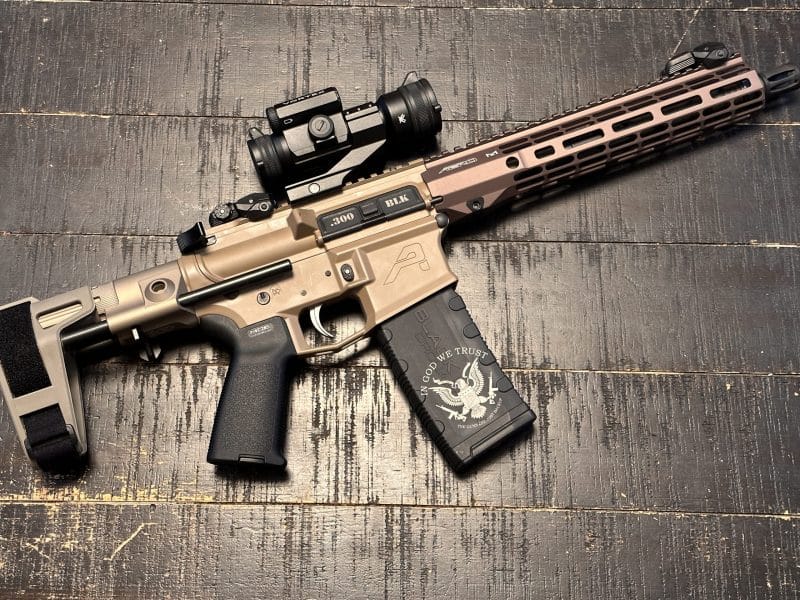
A few decisions need to be made before parts can be purchased. Will it be an AR-15 rifle or pistol? If it will be a pistol, what length of barrel? A typical AR-15 will be in a .223, 5.56, or Wilde. For an AR-15, I would opt for basic mil-spec parts and a 5.56 NATO barrel. A .300 Blackout can also be made from the same parts as a mil-spec AR except for a different barrel. For this build, I am going with the .300 Blackout. There are plenty of other calibers out there, but except for the barrel, I want to stick with standard AR-15 parts for now.
The price of building an AR-15 rifle/pistol can vary greatly. I once made it a project to see how cheap I could build one. It was just over $300, and that AR pistol is still running great today. If you want to go with more expensive, high-end parts, it is not hard to spend $2K or $3K on a build. There is a lot of room to make it what you want.
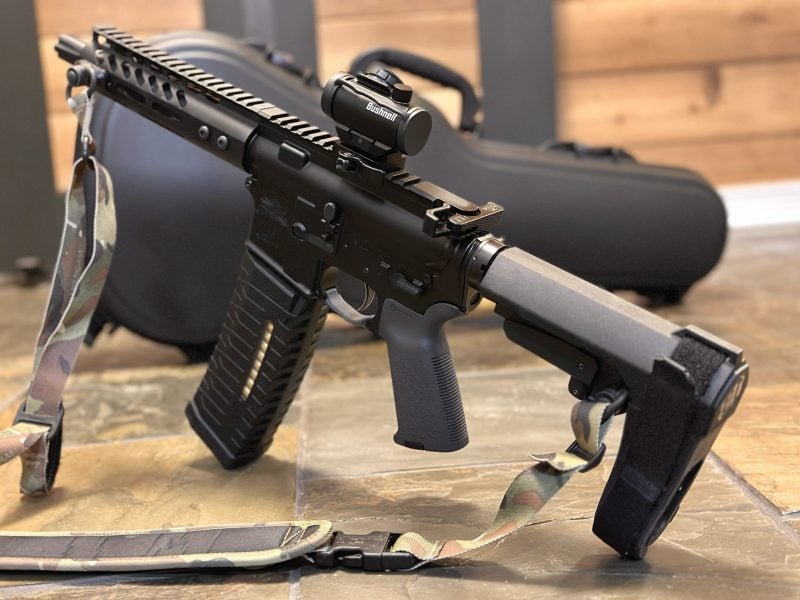
I will be building an AR-15 pistol in .300 Blackout and I’m going to play around some with different finishes. I like the mixture of color tones that are becoming popular, so I am going to try the light/dark brown combo look. But we have plenty of time to get into each part and finish in the upcoming articles.
Armorers Tools
When working on an AR-15 rifle, there are some tools that are needed. It can be tempting to skip the tools and just “wing it” but investing in some basic armorers’ tools is worth the money and makes the job much easier. If you plan to start working on your own rifle or building more than one, I recommend buying the Real Avid Master Armorers Kit or the Wheeler AR Ultra Armorer’s Build Kit. These kits have just about every tool needed to assemble and work on an AR rifle. You will need to set up your “build station.” And don’t worry, this can be done in a garage or at a kitchen table. Besides the armorers’ tools, there are some other items that will be needed.

Other tools needed include:
- Cleaning mat
- Gun oil
- Gun cleaner
- Flashlight
- Magnet (for finding those little springs when they go flying)
- Small hammer (this can be a gunsmith hammer or a simple 4 oz double-sided hammer)
- Barrel nut grease
- Blue tock tight
- Vice
- Rubber mallet
Setting up a workstation
A workstation for a gun does not have to be complicated. It can be anywhere you want, as long as you have plenty of light and a place to set up your vise. I wanted my vise to be portable, so I mounted it to a 2’X3′ foot piece of wood that was two inches thick. This allows me to move it around if I need to. Besides the armorer’s kit, I have a toolbox for those random tools you pick up along the way. Some I use a lot, and others not so much. But it’s better to have a tool and not need it than to need one and not have it, right?

I bought a cheap vise for $40, so they are not expensive. Out of all my tools, I use the vise and Real Avid Vice Block the most. These two items are game changers when building an AR. If you do not want to buy the armorer’s kit, you can pick and choose specific tools to order with your gun parts as you go along. I can’t stress enough the importance of buying the right tools. It makes a night and day difference when assembling or disassembling your rifle.
The Lower Receiver
The lower receiver is the part of the gun that makes it functional, according to the ATF. Because of this, the lower receiver must be purchased from an FFL dealer (gun store). The lower receiver can be ordered online if you can’t find one locally that you like. It will have to be shipped to a local gun store where it will be treated the same as a firearm. Everything else can be shipped directly to your home.

Ordering Parts
I like to order the lower and upper receivers together from the same company to make sure the colors match. Companies use the same name for colors, but they are often different. I ordered my stripped lower and upper from Aero Precision. The lower I selected is the M4E1 Enhanced Forged Lower in FDE (flat dark earth).
Next, purchase the lower parts kit. This kit includes everything needed to assemble the lower receiver. Other required parts you will need are the buffer tube, spring, and adjustable stock. Part 4 covers the installation of the buffer tube and spring.
Here is a list of what you’ll need:
- Stripped lower receiver
- Lower parts kit
- Buffer tube and spring set
- Adjustable stock that fits mil-spec buffer tube
Installing the Mag-Release Assembly
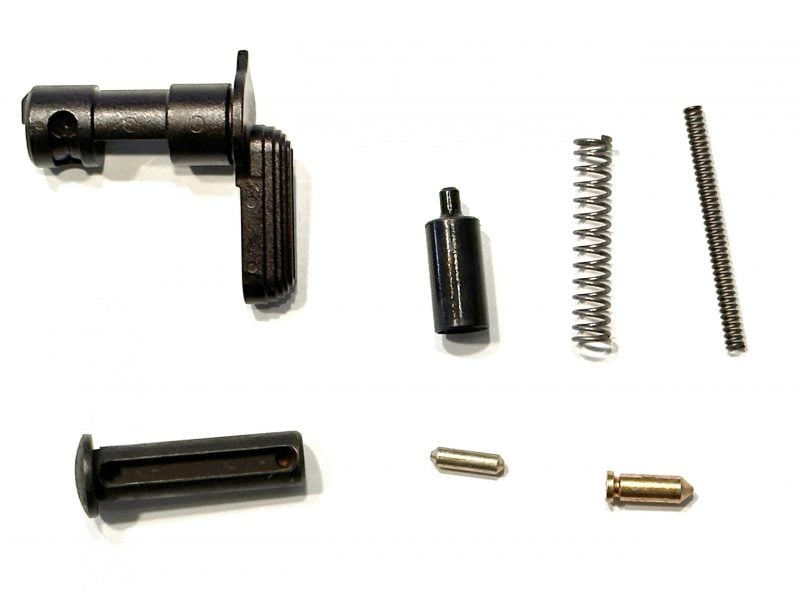
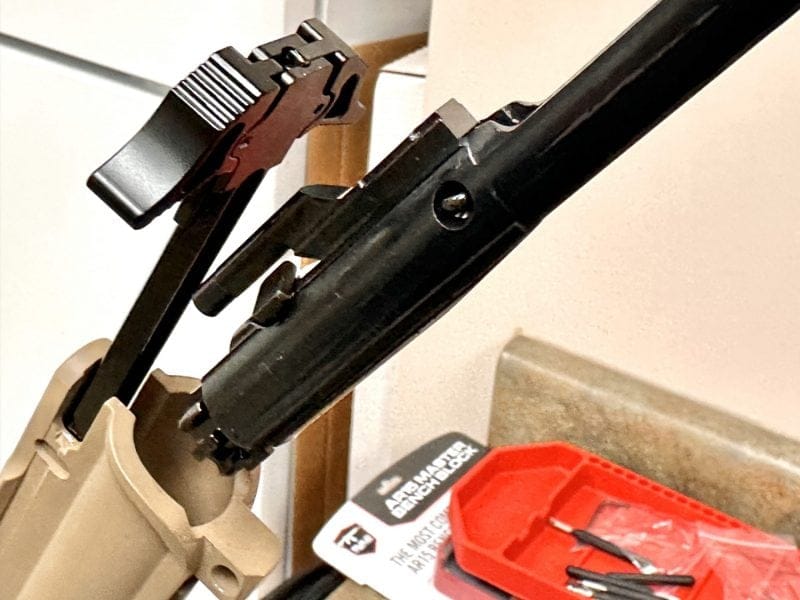
If you have a vice and vice block as mentioned in Part 1, the lower receiver should be placed on the vice block. If you do not have a vice, you will need someone to hold the lower receiver up while you work. I purchased the Anderson Manufacturing lower parts kit for my build. From the lower parts kit, you will need both pieces of the mag release and the largest spring out of the parts kit. Most kits mark the pieces for you to help identify them easier.

When installing the mag-release assembly, you first insert the mag release (pictured above on the right). It will fit into the groove on the lower receiver and sit flush. The spring will then go into the hole on the other side and slide over the threaded part of the mag release. Next, the mag button will thread onto the mag release, compressing the spring as it does.
You will only be able to turn the mag button a couple of times before you run out of room to turn it. Once it is on the threads, push the button in all the way with the back end of a punch and turn the mag release on the other side. Turn it about seven times or until it sits flush. You can test it by pulling it on and off the vice block. If you must push in the mag release to get it off, it is working correctly.
Trigger Guard
Most mil-spec lower receivers will need to have a trigger guard installed. The lower receiver I purchased has a fixed trigger guard, so it is not needed. If yours does need a trigger guard, however, you simply attach the end with the spring-loaded pin first and then line the holes up for the roll pin to be inserted on the other end. This is the largest roll-pin on the AR-15 and takes a small hammer and 1/8-inch roll-pin punch to get it in. Once the holes are lined up, lightly tap the roll pin until it is flush on both sides.

Installing the Bolt Catch Assembly
The bolt catch assembly includes the bolt release, roll pin, spring, and plunger. To install the assembly, first insert the spring into the hole above the mag release. The plunger will then go in the same hole, compressing the spring as you push it in. The larger rounded side faces outward. The bolt release then fits in the groove and pushes the plunger and spring further in place. Be sure to keep pressure on the bolt release until the roll pin is in place or the spring will come flying out. Once the bolt release is lined up with the holes, the roll-pin can be inserted and then tapped into place.

The best way to do this is to use a roll pin holder, which looks like a punch but has a hole at the end that holds the roll pin while you line it up and tap it in part way. Once the pin has been started, you can use a roll pin punch to finish tapping it in until it is flush. Take this part slow or you can scratch up the side of the receiver with the punch and hammer.

Takedown Pins
There are two takedown pins on the lower receiver. One in the front and one in the back. These are what connect the upper receiver to the lower. The rear takedown pin must be installed along with the buffer tube, so we will only install the front take down-pin for now. The front takedown pin is the longer of the two. It will also have a small spring and detent pin. These are not hard to pick out of the lower parts group because both detents and springs are the same. The small detents have the shape of a bullet and are brass.

Installing the front takedown pin is the most difficult. The Real Avid Pivot Pin Tool makes this much easier. If you do not have one, you can also use a 1/4-inch clevis pin from the hardware store. You start by inserting the spring into the small hole next to the double eyelet (where the takedown pin goes) on the front of the receiver. Then insert the small detent pin after the spring. The tricky part next requires the detent to be pushed inside the small hole, allowing the takedown pin to pass through the eyelet. The takedown pin has a flat side that goes against the detent. Once the takedown pin is clear of the detent, the pressure from the spring will lock the takedown pin in place when it is closed or open.
The Trigger Assembly
The trigger can be intimidating when you look inside and see springs and several parts all running together. I left the trigger alone for a long time because I thought it would be too hard to reassemble. When you break each part down, however, it’s not that complicated. All the parts needed are included in the lower parts kit. As stated in Part Two, I purchased an Anderson Manufacturing lower parts kit that included the trigger assembly.
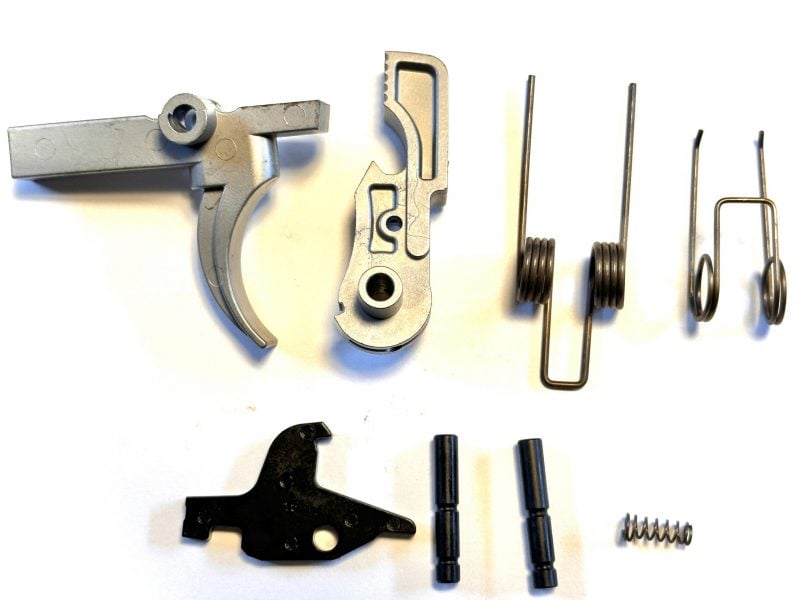
From the lower parts kit, you will need the following:
- Trigger & Trigger Spring
- Hammer & Hammer Spring
- Disconnector & Disconnector Spring
- Two Trigger Pins
Step One: Installing the Trigger, Trigger Spring, Disconnector, and Disconnector Spring
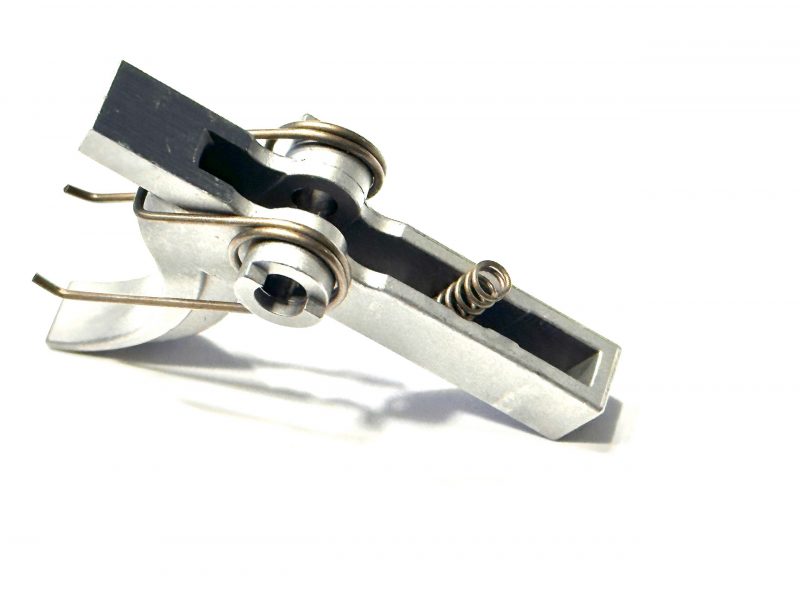
The first step is to attach the trigger spring to the trigger. The trigger spring has two long pieces sticking off of it that look like elephant tusks. These go on the bottom and face toward the front of the trigger. The spring coils fit over the two eyelets on the side of the trigger (see photo below). Next, the small disconnector spring can be installed.
One side of the disconnector spring is a little bigger than the other. The bigger end goes down, into the trigger frame. There is a small indention where the spring should rest. When you push the spring into the indention, you should hear a “click” as it snaps in. Once these two parts are in, the trigger can be set aside for the moment.
Step Two: Hammer and Spring
The hammer spring goes on next. If you install the hammer and the tension is not moving the hammer in the right direction, it can be taken out and switched around. When installing the hammer spring, I lay the hammer down on its side with the flat side facing down (as pictured below). The spring has two long prongs that stick out from the spring coils. These should face away from the hammer. The short side of the spring goes on top of the hammer with the prongs on the bottom. The coils fit over the eyelet just like they did on the trigger.

Step Three: Trigger Installation
With the springs on the trigger and hammer, it is time to install the trigger into the lower receiver. The trigger is installed first with the hammer going on top after that. This process does not take any tools unless you need to remove a trigger pin to take it back out. If you need to remove a pin, I use the Real Avid 1/8-inch punch to tap it back out. If you do need to remove a pin, make sure you keep your thumb on top of the hammer and trigger as you take the pin out or it will go flying across the room.

To install the trigger, you pick it up and set it into the lower receiver. There is a small square cutout where the trigger fits through the bottom of the receiver. Before you put the trigger pin in to hold the trigger down, the disconnector will need to be installed as well. For this step, set the disconnector on top of the trigger. There is a cutout on the disconnector that sets on top of the small disconnector spring.
Once the trigger and disconnector are in the lower receiver, I use my thumb to push down on the top of the disconnector just like I do with the hammer installation (see photo below). As you push down on the disconnector and trigger, the eyelets will line up with the hole in the side of the receiver. I use my other hand to push the pin through until it is flush.
Step Four: Hammer Installation
The hammer has more pressure on it than the trigger, making it a little harder to install. The hammer can be laid on top of the trigger with the two prongs resting on the sides of the trigger and the hammer facing towards the front of the receiver (see photo below). I hold the lower receiver with my left hand and push down on the middle of the hammer with my left thumb. The hammer will start to fold as you push the eyelet down into the corner of the receiver. Once the holes are lined up, I use my right hand to insert the second pin.

Once the second pin is in, the hammer and trigger should be functioning. The trigger can be tested to see if it functions correctly, but I would use my thumb to let the hammer down slowly so it does not slam against the bolt catch. The hammer should lock in place when pulled back and release when the trigger is pulled.
Completing the Lower Receiver
The lower receiver contains most of the springs, pins, and detents, so the rest is much easier to assemble. I am using an Anderson Manufacturing parts kit, which contains mil-spec parts. Individual parts can also be purchased, such as an enhanced selector, different styles and colors of pistol grips, etc. To get started today, you will need the following items:
- Safety/Selector and spring
- Rear takedown pin with spring and detent
- Buffer detent pin and spring
- Buffer tube
- Buffer spring and buffer weight
Installing the Buffer Tube
Before the tube can be installed there are a few other parts that need to go on the receiver. For this step, the lower receiver will need to be placed on the lower vise block, so it is held securely while you work. I like to have lots of light for this part too, so I don’t lose a spring. If you do lose one, a good magnet can help recover it from the floor.
With the receiver on the vise block, place the rear takedown pin in the hole from the right side of the receiver. It does not need to go all the way through the receiver but only started. The flat side of the takedown pin should be facing toward the back of the receiver. Next, the takedown detent pin is placed in the small hole in the back of the receiver, and the takedown pin spring follows. The spring will not go in all the way, so make sure not to bump it while you work. This will send it flying across the room.
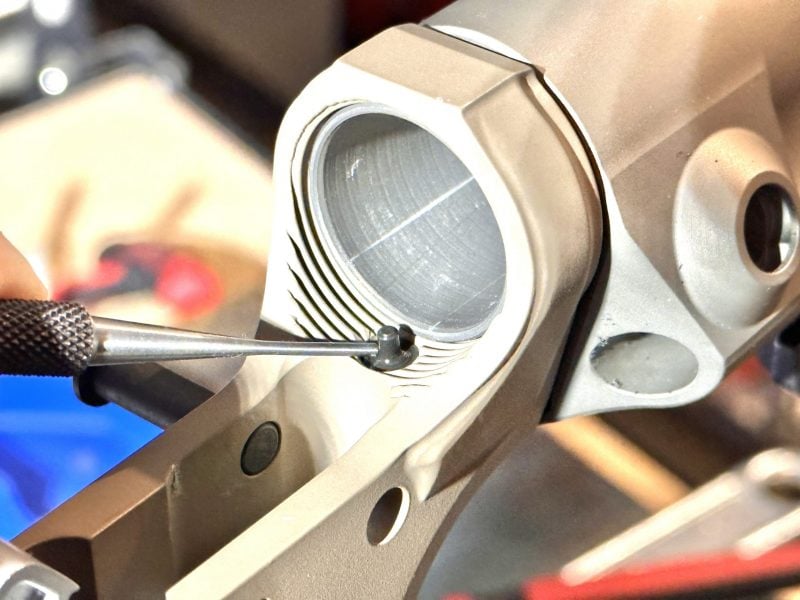
Now, the buffer tube can be threaded onto the lower receiver. For now, it only needs to be started and not screwed in all the way. Next, the buffer detent spring and detent can be placed in the hole inside the threaded area where the buffer tube goes (see photo below). You can screw the buffer tube on until it is getting close to the detent. When it is up against it, use a punch to press down on the detent and screw the tube just far enough that it catches the detent and holds it down. You also want to make sure the back plate does not hit the takedown detent spring as you turn the buffer tube.
At this point, the backplate should be nearly touching the takedown detent spring. Being careful not to bend the spring, you can push in on the backplate until it is up against the receiver, compressing the spring in the process. While holding the backplate firm with one hand, begin tightening the castle nut until it is hand-tight. With the buffer tube intact, check the buffer detent to make sure it will move up and down. If the tube is too tight, it can press against the detent and stop it from moving. The castle nut can be tightened with an AR-15 armorer’s wrench to secure the buffer tube in place.

Installing the Selector Switch and Pistol Grip
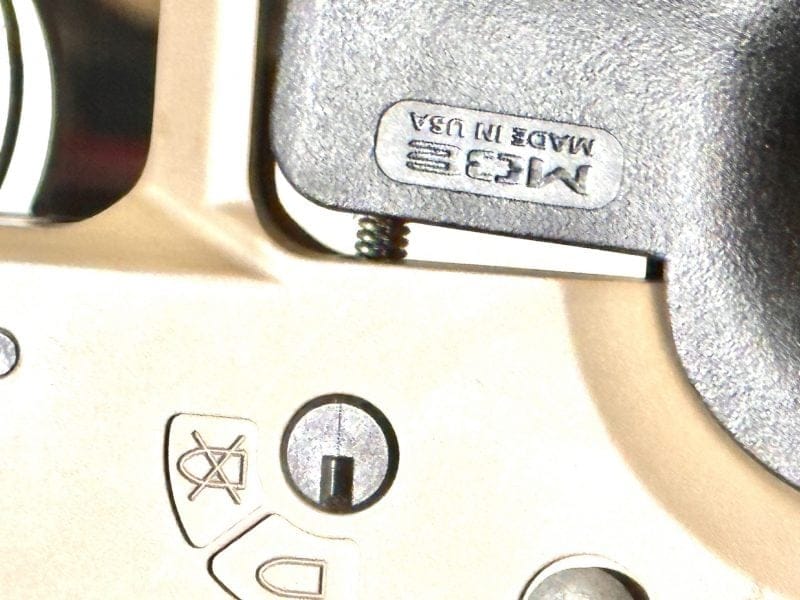
To install these pieces, I like to turn the receiver upside down on the vice block. This will make it easy to install the selector detent spring and pistol grip. With the receiver upside down, place the selector switch in the hole that is behind and slightly above the trigger. When the receiver is upside down, the selector will go in from the right side. Next, the selector detent will go in the small hole above the selector switch (see image below).

Now, we need the pistol grip. There is a small hole in the top of the grip that will hold the detent spring for the safety switch. The kit I ordered was missing the detent spring, so it was not pictured. I had to find an extra when I installed the grip. The detent safety spring looks a little like the takedown detent springs but is a bit thicker. When placed in the hole on the top of the grip, the spring will be sticking out a little.
This is the part that goes into the hole on the receiver. I do this by holding the spring in with my thumb as I slowly push the pistol grip over the notch on the receiver. Once the spring is lined up with the hole, you can push the grip down until it is flush (see image below). Using the bolt and lock washer that came with the grip, tighten the grip onto the receiver using a 3/16 T-handle Allen wrench.
Finishing Up
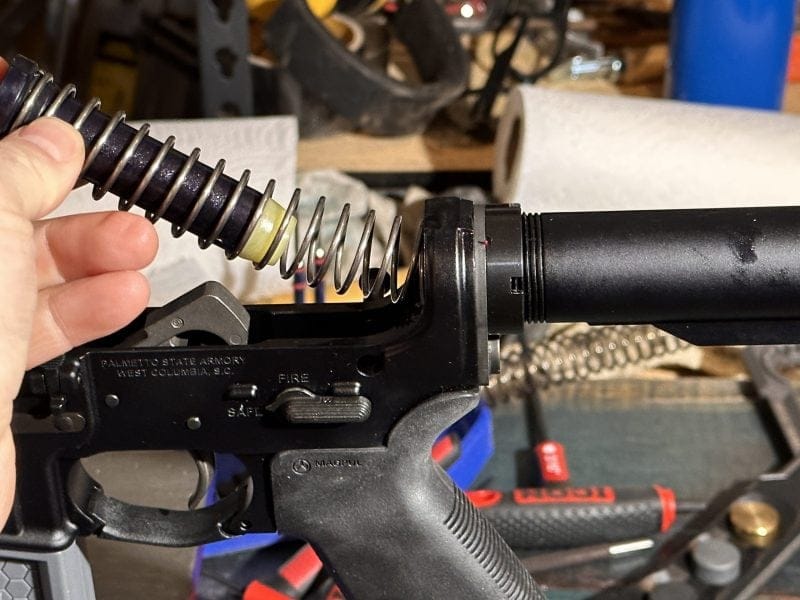
Once the pistol grip has been tightened down, the pistol brace or stock can be attached. Most braces and stocks will slide on by pulling out on the spring-loaded lever that is normally compressed when adjusting. At this point, I perform a function check of the trigger, hammer, selector switch, and takedown pins. I also like to place some oil on the takedown pins. The buffer spring and weight can be inserted into the tube as the last part of the lower assembly.
Now that the lower assembly is complete, it can be set aside as we move on to the upper receiver.
The Upper Receiver
In this final installment of our Building an AR-15 series, I will cover the parts that need to be ordered for the upper receiver. Then, we can assemble the upper receiver and complete the AR-15. I want to cover the rest of this process in one article, so I will jump right in.
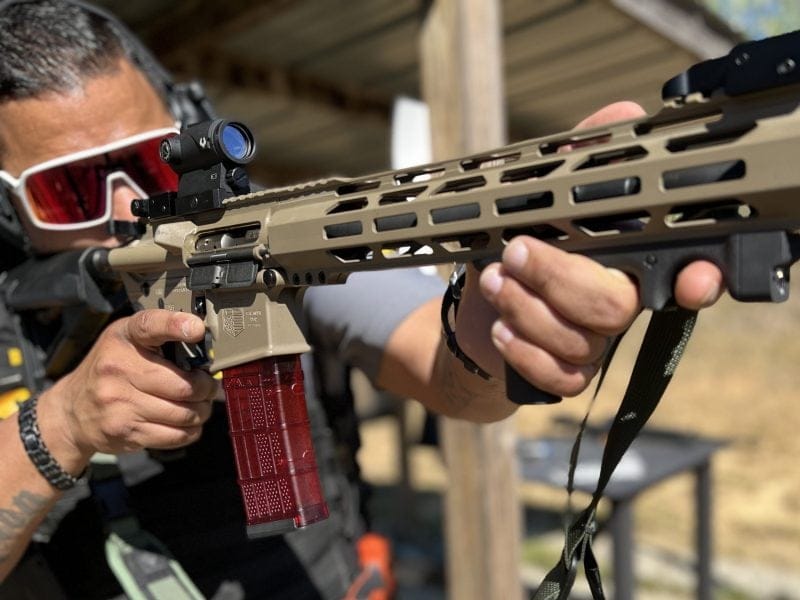
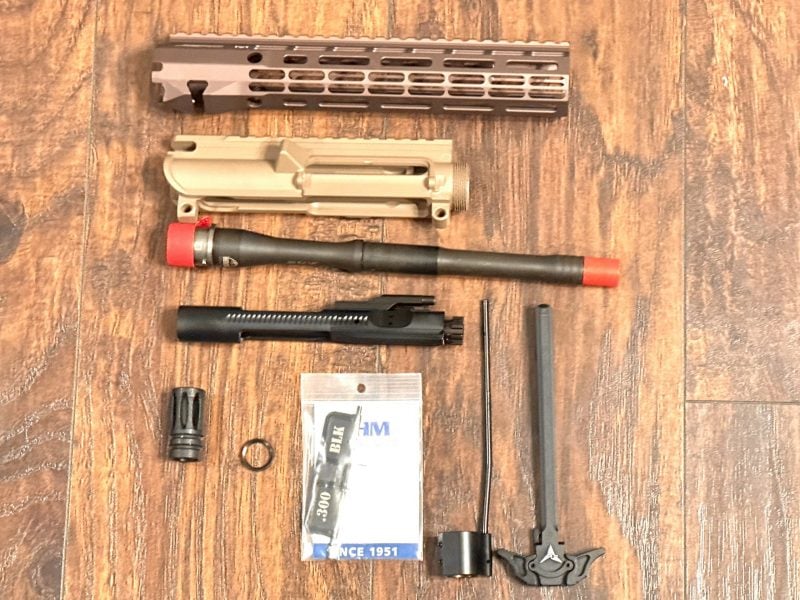
I ordered my upper receiver from Aero Precision at the same time as the lower because I wanted the color on these two parts to match. As long as they are mill-spec parts, they don’t have to come from the same manufacturer, but I would recommend it if this is your first build. The color scheme of the rifle can be whatever you want it to be. I chose to do a light brown upper and lower receiver with a darker brown handguard. Some want to stick to the traditional AR look and go with all-black. I have started to like mixing colors on my guns for fun. Here is a list of the parts that will be needed for this upper assembly:
- Upper receiver
- Dust cover
- Barrel
- Gas block and gas tube
- BCG (bolt carrier group)
- Charging handle
- Muzzle device
Getting Started
They make a tool that will hold the upper assembly in the vice while you work on it. Unless you plan to do this a lot, I would just attach the upper receiver to the lower and then set the lower in the Real Avid Vice Block. The takedown pins can be closed to hold it secure. The first thing we will assemble is the dust cover and forward assist. Most uppers will come with the forward assist already installed. The Aero Precision that I ordered does not have a forward assist, so I did not need to assemble that part.
The forward assist has a large spring and roll pin that comes with it. To install this part, slide the spring over the forward assist. Push it into the receiver with the curved part of the forward assist facing inward (towards the receiver). This should also line the holes up where the roll pin goes. An easy method I like to use for installing the roll pin is to use a small punch and push it through the hole from the bottom side. This will hold the forward assist in place temporarily. Then, insert the roll pin from the top using a 3/32 roll pin punch. You may want to push in on the forward assist as you go to make sure it is working properly. It should have spring tension on it as you push in.
Dust Cover
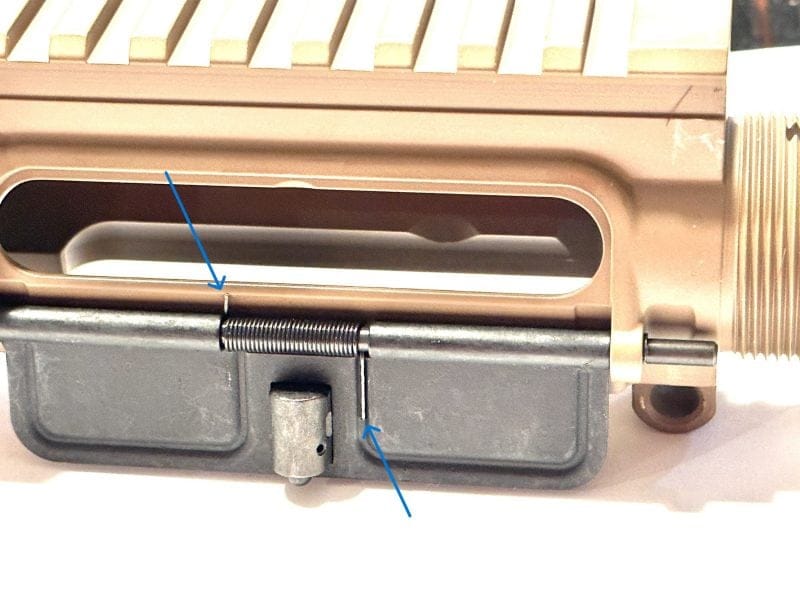
The dust cover can be a little hard if you have big fingers, but don’t worry it can still be done. There are several ways to install the dust cover, but here is the one I use the most. I start by placing the dust cover between the eyelets like it will sit when it’s opened (see photo below). The spring will need to be placed in the cutout of the dust cover with the short stem facing up and the long stem facing down. Next, from the front side of the gun, slide the dust cover part way in so that it goes into the spring about a quarter of the way.

Now, the spring is positioned as it should be, but you will need to grab the end of the spring the rod is not in (the side with the short stem) and give it a full turn. Once it has made a full turn, the spring needs to be pushed against the receiver and held down while you push the dust cover rod the rest of the way through the spring and into the other eyelet. When you are done, the spring should be centered in the dust cover with the short stem against the receiver and the long stem over the dust cover.
Installing the Barrel
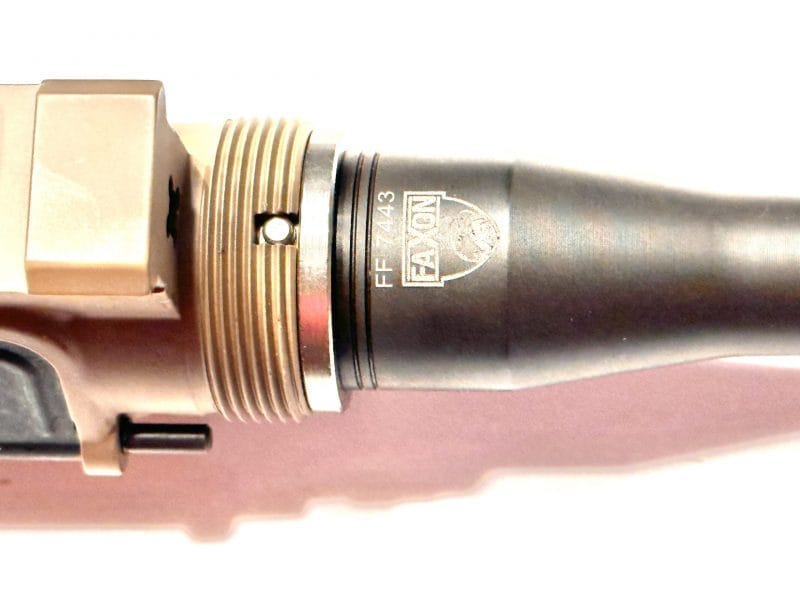
Installing the barrel is one of the easiest parts of the upper assembly. I purchased a 10 1/2-inch .300 blackout barrel by Faxon. It is a 416-R stainless steel barrel that is Nitride coated. The barrel will determine how accurate the rifle is. A cheap barrel will work but may not last as long or be as accurate. I chose the Faxon barrel because it is tested and individually checked for headspace with a precision PTG gauge. This barrel requires a pistol-length gas block with a diameter of .750” which is a common diameter. I ordered a gas block that had the tube already installed on it.
There is a small post that sticks up from the back of the barrel. As you push the barrel onto the upper frame, this post will fit into a slot on the receiver (see photo below). If the barrel is tight and will not push in all the way, use a heat gun or small torch to heat the end of the receiver and the barrel will go in the rest of the way.
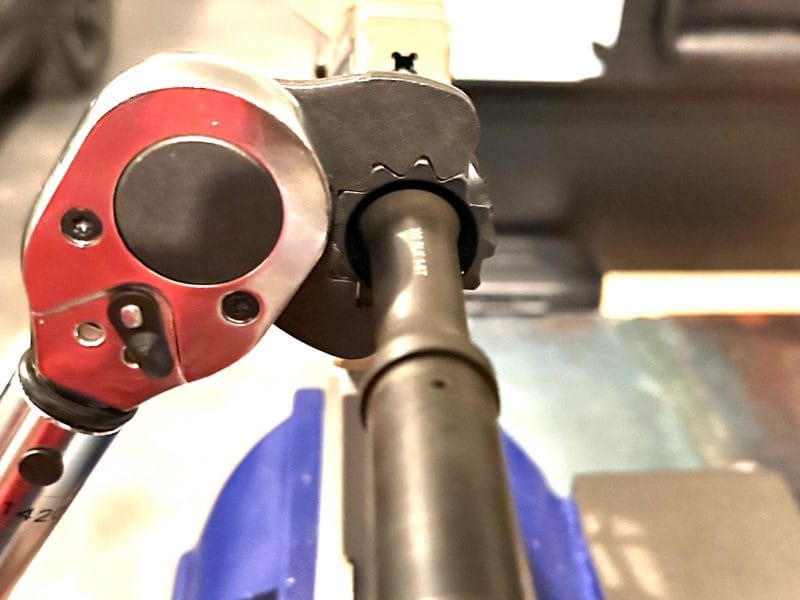
Apply some synthetic grease to the threads on the upper receiver. Then screw on the barrel nut that came with the handguard. Some barrel nuts will have some very thin washers that can be used to get the barrel nut lined up properly for the gas tube. Many of the new handguards now come with barrel nuts that do not have to be lined up, only tightened. I purchased my handguard from Aero Precision, which does not need to be lined up for the gas tube to fit over the top of it. Tighten the barrel nut down with a torque wrench (between 30 and 50 ft-lbs).
Installing the Gas Block and Tube
The gas block is the next part to install. If you have a block and tube separate, the tube will need to be placed on the gas block with the provided roll pin. Slide the gas block over the barrel with the tube facing the gun. There is a small opening in the receiver above the barrel that allows the gas tube to slide through. The gas block should stop directly over the small hole in the top of the barrel. This allows the gas from the barrel to go through the tube to make it cycle for the next round.
There are two small screws on the bottom of the gas block that can be tightened once the gas block is in the correct place. I like to hand-tighten the screws and wait until I have fired the gun before I go back and add Blue-Loctite to the screws to keep them from coming loose. If you need to take them back out, just heat them up with a heat gun first.
Muzzle Device and Handguard Installation
The muzzle device will come with a crush washer that goes on the end of the barrel. Use an armorer’s wrench to tighten the device until it is snug. The handguard is what really makes the gun come together. Place the handguard over the barrel nut and use the provided screws to secure it. Each handguard has its own barrel nut and system of attaching the handguard. The Aero Precision handguard I purchased uses a clamp system with one locking screw in the bottom.

Completing the Build
With all the parts installed, we can now insert the charging handle and BCG into the upper. To do this, push the rear takedown pin open and flip open the upper receiver. The charging handle will slide into the groove in the upper receiver and the BCG will slide in after that. The receiver can then be closed, and the build is complete.
I like to perform final functions check of the trigger, selector switch, and cycle the bolt. If all appears to be functioning correctly, I head to the range.
Note: if this is your first time building an AR-15, it is advisable to find someone with experience to check it before shooting. Other than that, enjoy shooting your new rifle for the first time and for many years to come.
*Disclaimer: While building an AR-15 rifle is fun and not complicated, it can be dangerous to fire a weapon that is not assembled correctly. This article is for information only. It is recommended that a weapon be checked by a certified armorer or gunsmith before firing.