Yesterday, in Part Two of our Building an AR-15 series, we covered the magazine release assembly, bolt catch assembly, and front takedown pin. Now we are ready for the trigger group. The trigger can be intimidating when you look inside and see springs and several parts all running together. I left the trigger alone for a long time because I thought it would be too hard to reassemble. When you break each part down, however, it’s not that complicated. All the parts needed are included in the lower parts kit. As stated in Part Two, I purchased an Anderson Manufacturing lower parts kit that included the trigger assembly.
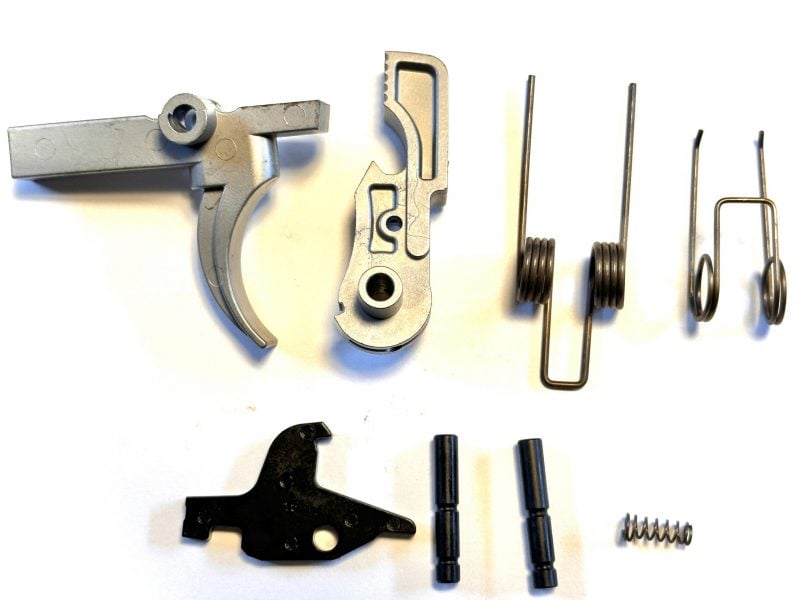
From the lower parts kit, you will need the following:
- Trigger & Trigger Spring
- Hammer & Hammer Spring
- Disconnector & Disconnector Spring
- Two Trigger Pins
Step One: Installing the Trigger, Trigger Spring, Disconnector, and Disconnector Spring
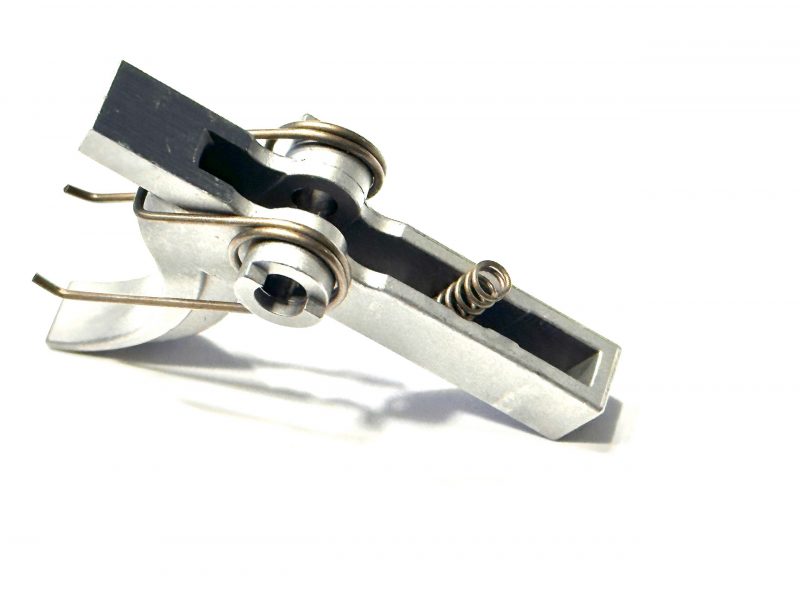
The first step is to attach the trigger spring to the trigger. The trigger spring has two long pieces sticking off of it that look like elephant tusks. These go on the bottom and face toward the front of the trigger. The spring coils fit over the two eyelets on the side of the trigger (see photo below). Next, the small disconnector spring can be installed.
One side of the disconnector spring is a little bigger than the other. The bigger end goes down, into the trigger frame. There is a small indention where the spring should rest. When you push the spring into the indention, you should hear a “click” as it snaps in. Once these two parts are in, the trigger can be set aside for the moment.
Step Two: Hammer and Spring
The hammer spring goes on next. If you install the hammer and the tension is not moving the hammer in the right direction, it can be taken out and switched around. When installing the hammer spring, I lay the hammer down on its side with the flat side facing down (as pictured below). The spring has two long prongs that stick out from the spring coils. These should face away from the hammer. The short side of the spring goes on top of the hammer with the prongs on the bottom. The coils fit over the eyelet just like they did on the trigger.

Step Three: Trigger Installation
With the springs on the trigger and hammer, it is time to install the trigger into the lower receiver. The trigger is installed first with the hammer going on top after that. This process does not take any tools unless you need to remove a trigger pin to take it back out. If you need to remove a pin, I use the Real Avid 1/8-inch punch to tap it back out. If you do need to remove a pin, make sure you keep your thumb on top of the hammer and trigger as you take the pin out or it will go flying across the room.

To install the trigger, you pick it up and set it into the lower receiver. There is a small square cutout where the trigger fits through the bottom of the receiver. Before you put the trigger pin in to hold the trigger down, the disconnector will need to be installed as well. For this step, set the disconnector on top of the trigger. There is a cutout on the disconnector that sets on top of the small disconnector spring.
Once the trigger and disconnector are in the lower receiver, I use my thumb to push down on the top of the disconnector just like I do with the hammer installation (see photo below). As you push down on the disconnector and trigger, the eyelets will line up with the hole in the side of the receiver. I use my other hand to push the pin through until it is flush.
Step Four: Hammer Installation
The hammer has more pressure on it than the trigger, making it a little harder to install. The hammer can be laid on top of the trigger with the two prongs resting on the sides of the trigger and the hammer facing towards the front of the receiver (see photo below). I hold the lower receiver with my left hand and push down on the middle of the hammer with my left thumb. The hammer will start to fold as you push the eyelet down into the corner of the receiver. Once the holes are lined up, I use my right hand to insert the second pin.

Once the second pin is in, the hammer and trigger should be functioning. The trigger can be tested to see if it functions correctly, but I would use my thumb to let the hammer down slowly, so it does not slam against the bolt catch. The hammer should lock in place when pulled back and release when the trigger is pulled.
Be sure to check in tomorrow for Part Four of our Building an AR-15 series. We will install the buffer tube assembly, selector switch, rear takedown pin, and pistol grip.