In Parts 1 and 2 of our Building a Glock series, we installed the lower parts kit on a Glock-compatible frame. In Parts 3 and 4 we will install the parts on a Glock-compatible slide. Because Glock has several generations (versions of the same gun) you want to make sure you are purchasing parts that work for that generation. Most people building a complete gun use Gen 3 parts because there are more of them on the market now. The Gen 5 has been out for a while and parts are available if you want to build one. But there are more options for a Gen 3.

The slide can change the whole look of the gun. There are color options to choose from and a wide variety of serrations and cutouts. Once you have chosen your slide, you will need a slide kit, barrel, and a set of sights. When the slide has cutouts, the finish of the barrel and color will also change the look of the gun. If you plan to use a compensator or silencer on the gun, a threaded barrel is a must. Don’t forget to select a slide with an RMR cutout if you plan to use an optic.
Firing Pin Safety
Locate the firing pin safety and firing pin safety spring. The spring is small and will fit in the end of the firing pin safety. There is a groove on the inside of the firing pin safety that will hold the spring in. Make sure the spring is pushed in far enough to catch the groove. If you hold the firing pin safety upside down and the spring falls out, it is not put in correctly. Place the firing pin safety pin in the large hole on the bottom of the slide. The spring should go in first. Push on the safety pin to make sure it moves freely.

The firing pin safety blocks the firing pin from striking the bullet. As the trigger is pulled, the trigger bar pushes up on the firing pin safety. This allows the firing pin to travel down the groove and strike the cartridge. Many people think the small lever on the trigger, called the trigger safety, is the only safety on a Glock pistol, but blocking the firing pin safety mechanically blocks the firing pin from contacting the cartridge.
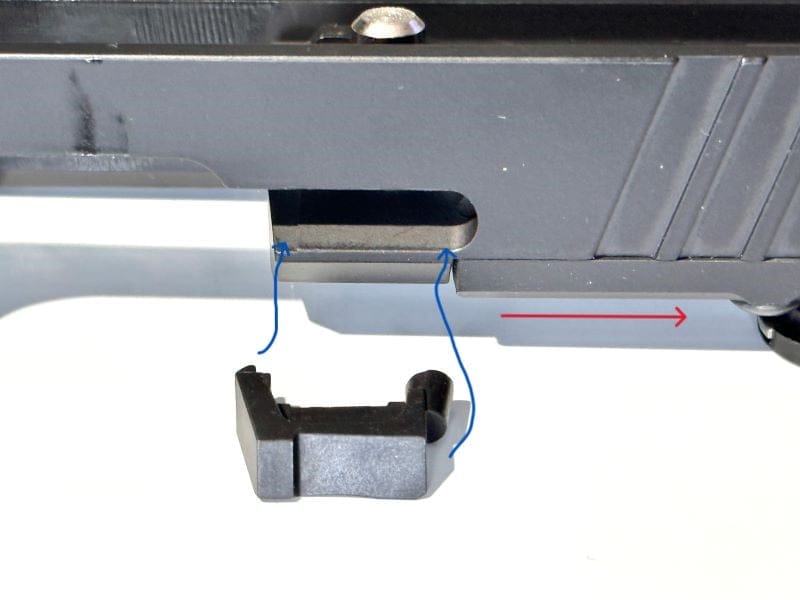
Installing the Extractor
The extractor is next up. On one side of the extractor is a part that is rounded like a pin. This part should be towards the rear of the gun (see photo below). The extractor will go in on the right side of the slide just behind the ejection port. Once it is in, push down on the firing safety and it will go in the rest of the way. The extractor is what grabs the bullet and pulls it out of the chamber when the slide is moving backward.
It is important to understand the difference between a failure to extract and a failure to eject when you work on your own firearms. As you can see from this process, changing out an extractor is very simple. But if you do not realize an issue is being caused by the extractor, you could end up taking off the wrong part. Extractors can get dirt in them, wear down or even break. If the cartridge is not being pulled out of the chamber, it is more than likely an extractor problem.
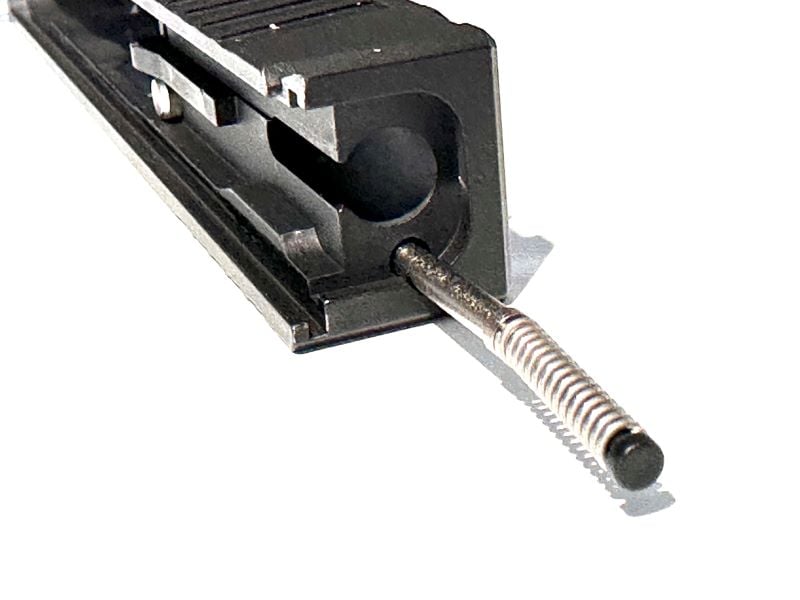
Extractor Depressor Assembly
For this part, you will need the spring-loaded bearing, extractor plunger spring, and extractor plunger. To assemble the extractor depressor assembly, place the spring over the end of the extractor plunger. There is a small, pointed side that the spring will snap onto. Then place the spring-loaded bearing onto the other end of the spring. The assembly will go into the small hole on the back of the slide. The metal end should go first. Make sure the assembly moves freely inside the channel or the extractor will not work properly.
In one case, I had an extractor plunger that was just a little too big. The pointed end that the spring pushes over was spreading the spring out just enough that it would not move freely inside the channel. I didn’t realize it would cause an issue until I fired the gun and found it would not eject any shells. To resolve this, I took the extractor plunger back out and carefully sanded down the end until the spring would push over it without a lot of force. The ejector plunger then moved freely in the channel, and I have never had another issue with it.
Summary
We are almost done with the slide assembly. Tomorrow, in the final installment of our Building a Glock series, we will assemble and install the firing pin assembly, and the slide plate cover. After that, we’ll wrap it up with the sights and barrel and our new build will be ready for a test drive on the range.
For some people, the process of building a gun is the fun part and for others, it’s the finished product. I like to build them, so I tend to set guns aside and forget about them once they are finished. I start looking at parts for my next gun build before I even finish the one I’m working on. But either way, it’s a good feeling to hold a gun and know that you built it with your own two hands. After Part 4, you will have a Glock-style pistol to be proud of.